Dynamic Blinkie Text Generator at TextSpace.net

Feedburner

I heart FeedBurner

Kamis, 16 Februari 2017

Menyembunyikan Index.php Dengan .htaccess

Siapa sih yang belum pernah membuka http://www.detik.com ? situs berita populer saat ini. Apakah anda pernah memperhatikan ketika membuka salah satu berita yang ada?, misalkan
http://www.detikinet.com/read/2010/04/20/133456/1341790/317/iphone-4g-sudah-diprediksi-kalah-dari-android
, coba perhatikan dan bandingkan dengan
http://www.presidensby.info/index.php/pers/siaran-pers/2010/04/21/478.html
Bukan sulap bukan sihir, ternyata tidak ada kata index.php setelah alamat website detik. Kita juga dapat menyembunyikan index.php dengan membuat sebuah script kecil yang diberinama .htaccess
Logikanya, ketika user mengakses file index.php, maka kita ganti dengan tanda / saja, sehingga index.php tidak terlihat. Selain itu kita juga dapat menyembunyikan isi folder atau direktori ketika seseorang mencoba membuka url tersebut.
Berikut ini contoh .htaccess yang bisa ada simpan di document root anda.

Options +FollowSymLinks
IndexIgnore */*
RewriteEngine on

# if a directory or a file exists, use it directly
RewriteCond %{REQUEST_FILENAME} !-f
RewriteCond %{REQUEST_FILENAME} !-d

# otherwise forward it to index.php
RewriteRule ^.*$ index.php [L]
Pastikan anda telah mengaktifkan mod_rewrite
Untuk pengguna Ubuntu cukup dengan mengetik perintah:
user@pegel:~$ sudo a2enmod rewrite
Jangan untuk menjalankan ulang web server dengan perintah:
user@pegel:~$ sudo /etc/init.d/apache2 restart
Semoga bermanfaat

Koneksi Android ke Database MYSQL mengggunakan PHP JSON

Selama ini database bawaan android adalah Sqlite Database. Namun bagaimana jika kita memanfaatkan Mysql sebagai database dan PHP Sebagai Server side nya ?
Berikut tutorial koneksi Android ke Mysql dengan menggunakan server PHP.
Pertama buat database dulu di mysql, misalnya database dengan nama android.
Selanjutnya buat tabel dengan nama kontak dengan struktur tabel sebagai berikut :
1
2
3
4
5
CREATE TABLE kontak(
id_kontak int (2),
nama varchar (255),
PRIMARY KEY( id_kontak )
);
Lalu isi tabel dengan data sesuai yang diinginkan . Misal nya

Selanjut nya adalah membuat file PHP untuk dikoneksikan ke Mysql.
Buat file php dengan nama db_config.php dan isikan kode berikut :
1
2
3
4
5
6
<?php
    define('DB_SERVER',"localhost");
    define('DB_USER' , "root");
    define('DB_PASSWORD',"");
    define('DB_DATABASE',"android");
?>
Kode tersebut digunakan untuk komunikasi dengan database mysql. Setting username dan password sesuai dengan konfigurasi mysql anda.
Selanjutnya buat file php dengan nama db_connect.php dan isi sebagai berikut :
1
2
3
4
5
6
7
8
9
10
11
12
13
14
15
16
17
18
19
20
<?php
class DB_CONNECT{
    function __construct(){
    $this->connect();
}
function __destruct(){
   $this->close();
}
function connect(){
  //require_once __DIR__ .'/db_config.php';
  include "db_config.php";
  $con = mysql_connect(DB_SERVER, DB_USER, DB_PASSWORD) or die (mysql_error());
  $db = mysql_select_db(DB_DATABASE) or die (mysql_error());
  return $con;
}
function close(){
   mysql_close();
 }
}
?>
Selanjutnya buat file php dengan nama bacaKontak.php, file ini digunakan untuk membaca semua data yang ada pada database mysql. isi file bacaKontak.php sebagai berikut :
1
2
3
4
5
6
7
8
9
10
<?php
  require_once __DIR__ .'/db_connect.php';
  $db = new DB_CONNECT();
  $select = mysql_query("SELECT * FROM kontak");
 
  while($value = mysql_fetch_assoc($select)){
    $output [] = $value;
  }
  print(json_encode($output));
?>
Nah sekarang tinggal buat file android nya.
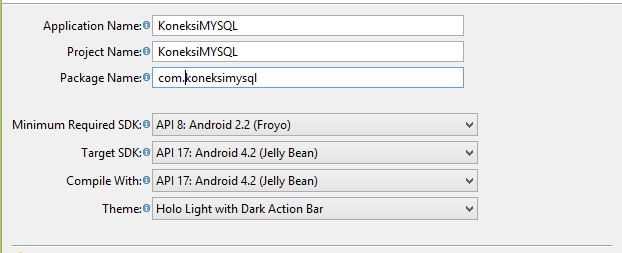
Buat project android baru dengan struktur sebagai berikut :
7
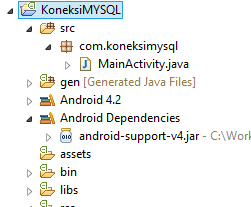
Setelah selesai, maka akan ada file dengan ekstensi .java seperti berikut :
6
Buka file MainActivity.java dan isi dengan kode berikut :
1
2
3
4
5
6
7
8
9
10
11
12
13
14
15
16
17
18
19
20
21
22
23
24
25
26
27
28
29
30
31
32
33
34
35
36
37
38
39
40
41
42
43
44
45
46
47
48
49
50
51
52
53
54
55
56
57
58
59
60
61
62
63
64
65
66
67
68
69
70
71
72
73
74
75
76
77
78
79
80
81
82
83
84
85
86
87
88
89
package com.koneksimysql;
 
import java.io.BufferedReader;
import java.io.InputStream;
import java.io.InputStreamReader;
 
import org.apache.http.HttpEntity;
import org.apache.http.HttpResponse;
import org.apache.http.ParseException;
import org.apache.http.client.HttpClient;
import org.apache.http.client.methods.HttpPost;
import org.apache.http.impl.client.DefaultHttpClient;
import org.json.JSONArray;
import org.json.JSONException;
import org.json.JSONObject;
import android.app.ListActivity;
import android.os.Bundle;
import android.util.Log;
import android.view.View;
import android.widget.AdapterView;
import android.widget.AdapterView.OnItemClickListener;
import android.widget.ListView;
import android.widget.Toast;
import android.widget.ArrayAdapter;
 
public class MainActivity extends ListActivity{
  String id;
  String[] nama;
 
public void onCreate(Bundle savedInstanceState) {
   super.onCreate(savedInstanceState);
 
   String hasil = null;
   InputStream is = null;
   StringBuilder sb = null;
 
   try{
      HttpClient httpClient = new DefaultHttpClient();
      HttpPost httpPost = new HttpPost("http://10.0.2.2/android/bacaKontak.php");
      HttpResponse response = httpClient.execute(httpPost);
      HttpEntity entity = response.getEntity();
      is = entity.getContent();
 
    }catch(Exception e){
      Log.e("log_tag", "Error Http Connection");
   }
   try{
      BufferedReader reader = new BufferedReader(new InputStreamReader(is, "iso-8859-1"), 8);
      sb = new StringBuilder();
      sb.append(reader.readLine()+"\n");
      String line = "0";
      while((line = reader.readLine()) != null){
         sb.append(line + "\n");
      }is.close();
      hasil = sb.toString();
   }catch(Exception e){
      Log.e("log_tag", "Error Converting result"+e.toString());
   }
   JSONArray jArray;
   try{
       jArray = new JSONArray(hasil);
       JSONObject jObject = null;
       nama = new String[jArray.length()];
       for(int i = 0; i<jArray.length(); i++){
       jObject = jArray.getJSONObject(i);
       nama[i] = jObject.getString("nama");
   }
   }catch(JSONException je){
       Toast.makeText(getBaseContext(), "No data Found",
       Toast.LENGTH_LONG).show();
   }
    catch (ParseException pe){
      pe.printStackTrace();
  }
     setListAdapter(new ArrayAdapter<String>(this, android.R.layout.simple_list_item_1, nama));
     ListView lv;
     lv = getListView();
     lv.setTextFilterEnabled(true);
     lv.setOnItemClickListener(new OnItemClickListener(){
 
     @Override
    public void onItemClick(AdapterView<?> arg0, View arg1, int arg2,long arg3) {
       // TODO Auto-generated method stub
 
    }
 
  });
 }
}
Dan terakhir, tambahkan code berikut di AndroidManifest.xml nya .
1
<uses-permission android:name="android.permission.INTERNET" />
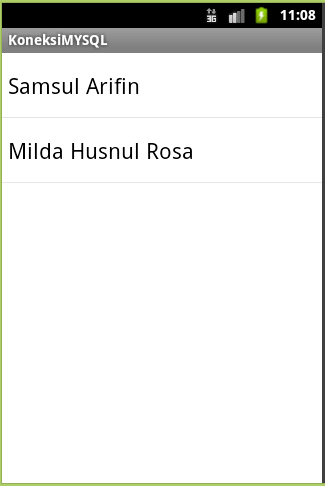
Hasil akhir nya nya sebagai berikut :

Semoga bermanfaat ! 🙂

Cara remove pm2

Remove PM2 :
pm2 kill
npm remove pm2 -g
#test with :
which pm2

Senin, 13 Februari 2017

Database CPANEL VPS WEBUZO

Membuat Database MySQL Panel VPS Webuzo - Untuk dapat membuat database MySQL, maka Anda dapat melakukannya melalui menu Add Database di Panel Webuzo Anda:

Masukkan nama database Anda dan klik Create

Selanjutnya, Anda akan harus membuat user database mysql untuk mengaksesnya. Klik Add User To Database 

Selanjutnya, berikan hak akses user databsae ke database mysql yang Anda buat tadi:


Selesai

Kamis, 09 Februari 2017

Windows Cannot be installed to this disk


Cara Mengatasi Windows Cannot be Installed to this disk

  • Restore / Kembalikan setttingan BIOS laptop ke default (mengembalikan settingan laptop ke default asalnya), ketika sudah di restore coba lakukan install ulang lagi apakah sudah bisa? kalo belum lanjut point di bawah.
  • Clean disk menggunakan diskpart (membersihkan disk memakai fungsi diskpart) caranya adalah,
    a). Ketika proses installasi tekan shift+f10, maka akan keluar gui comand prompt.
    b). Ketik diskpart, lalu ketik list disk untuk melihat list disk yang tersedia.
    c). Setelah melihat list disk, ketik select disk 0, 0 adalah disk yang akan kita bersihkan.
    d). Ketik clean, selesai. Catatan : backup terlebih dahulu data-data sebelum melakukan clean disk, karena clean disk akan menghapus seluruh isi disk.
  • Setelah proses clean disk selesai, maka selanjutnya kita tinggal melanjutkan proses instalasi seperti biasanya. Catatan: tidak perlu restart laptop, tetapi langsung lanjut ke proses instalasi windows selanjutnya saja, jadi dari proses restore dan clean disk dilakukan dalam satu proses sampe proses instalasi.
  • Selesai masalah instalasi berhasil kita tangani.

Selasa, 07 Februari 2017

Adding a Google Map with a Marker to Your Website

Introduction

This tutorial shows you how to add a simple Google map with a marker to a web page. It suits people with beginner or intermediate knowledge of HTML and CSS, and a little knowledge of JavaScript. For an advanced guide to creating maps, read the developer's guide.
Below is the map you'll create using this tutorial.
The section below displays the entire code you need to create the map in this tutorial.
function initMap() {
  var uluru = {lat: -25.363, lng: 131.044};
  var map = new google.maps.Map(document.getElementById('map'), {
    zoom: 4,
    center: uluru
  });
  var marker = new google.maps.Marker({
    position: uluru,
    map: map
  });
}
<h3>My Google Maps Demo</h3>
<div id="map"></div>
#map {
  height: 400px;
  width: 100%;
 }
<!-- Replace the value of the key parameter with your own API key. -->
<script async defer
src="https://maps.googleapis.com/maps/api/js?key=AIzaSyCkUOdZ5y7hMm0yrcCQoCvLwzdM6M8s5qk&callback=initMap">
</script>

Try it yourself

Hover at top right of the code block to copy the code or open it in JSFiddle.
<!DOCTYPE html>
<html>
  <head>
    <style>
       #map {
        height: 400px;
        width: 100%;
       }
    </style>
  </head>
  <body>
    <h3>My Google Maps Demo</h3>
    <div id="map"></div>
    <script>
      function initMap() {
        var uluru = {lat: -25.363, lng: 131.044};
        var map = new google.maps.Map(document.getElementById('map'), {
          zoom: 4,
          center: uluru
        });
        var marker = new google.maps.Marker({
          position: uluru,
          map: map
        });
      }
    </script>
    <script async defer
    src="https://maps.googleapis.com/maps/api/js?key=YOUR_API_KEY&callback=initMap">
    </script>
  </body>
</html>

Getting started

There are three steps to creating a Google map with a marker on your web page:
  1. Create an HTML page
  2. Add a map with a marker
  3. Get an API key
You need a web browser. Choose a well-known one like Google Chrome (recommended), Firefox, Safari or Internet Explorer, based on your platform.

Step 1: Create an HTML page

Here's the code for a basic HTML web page:
<h3>My Google Maps Demo</h3>
<div id="map"></div>
#map {
  width: 100%;
  height: 400px;
  background-color: grey;
}
<!DOCTYPE html>
<html>
  <head>
    <style>
      #map {
        width: 100%;
        height: 400px;
        background-color: grey;
      }
    </style>
  </head>
  <body>
    <h3>My Google Maps Demo</h3>
    <div id="map"></div>
  </body>
</html>
Note that this is a very basic page with a heading level three (h3), a single div element, and a style element which are all explained in the table below. You can add any content you like to the web page.

Try it yourself

At the top right corner of the sample code above are three buttons. Click the left-most button to open the sample in JSFiddle.

Understanding the code

This table explains each section of the above code.
Code and description

<html>
 <head>
 </head>
 <body>
 </body>
</html>

Creates an HTML page consisting of a head and a body.

<h3>My Google Maps Demo</h3>

Adds a heading level three above the map.

<div id="map"></div>

Defines an area of the page for your Google map.
At this stage of the tutorial, the div appears as just a grey block, because you have not yet added a map. It's grey because of the CSS you've applied. See below.

<style>
 #map {
   width: 100%;
   height: 400px;
   background-color: grey;
 }
</style>

The style element in the head sets the div size for your map.
Set the div width and height to greater than 0px for the map to be visible.
In this case, the div is set to a height of 500 pixels, and width of 100% to display the across the width of your web page. Apply background-color: grey to the div to view the area for your map on the web page.

Step 2: Add a map with a marker

This section shows you how to load the Google Maps JavaScript API into your web page, and how to write your own JavaScript that uses the API to add a map with a marker on it.
function initMap() {
  var uluru = {lat: -25.363, lng: 131.044};
  var map = new google.maps.Map(document.getElementById('map'), {
    zoom: 4,
    center: uluru
  });
  var marker = new google.maps.Marker({
    position: uluru,
    map: map
  });
}
<h3>My Google Maps Demo</h3>
<div id="map"></div>
#map {
  height: 400px;
  width: 100%;
 }
<!-- Replace the value of the key parameter with your own API key. -->
<script async defer
src="https://maps.googleapis.com/maps/api/js?key=AIzaSyCkUOdZ5y7hMm0yrcCQoCvLwzdM6M8s5qk&callback=initMap">
</script>
<!DOCTYPE html>
<html>
  <head>
    <style>
      #map {
        height: 400px;
        width: 100%;
       }
    </style>
  </head>
  <body>
    <h3>My Google Maps Demo</h3>
    <div id="map"></div>
    <script>
      function initMap() {
        var uluru = {lat: -25.363, lng: 131.044};
        var map = new google.maps.Map(document.getElementById('map'), {
          zoom: 4,
          center: uluru
        });
        var marker = new google.maps.Marker({
          position: uluru,
          map: map
        });
      }
    </script>
    <script async defer
    src="https://maps.googleapis.com/maps/api/js?key=YOUR_API_KEY&callback=initMap">
    </script>
  </body>
</html>

Try it yourself

At the top right corner of the sample code above are three buttons. Click the left-most button to open the sample in JSFiddle.

Understanding the code

Notice that the above sample no longer contains the CSS that colors the div grey. This is because the div now contains a map.
This table explains each section of the above code.
Code and description

<script>
async defer
src ="https://maps.googleapis.com/maps/api/js?key=YOUR_API_KEY&callback=initMap"
</script>

The script loads the API from the specified URL.
The callback parameter executes the initMap function after the API is completely loaded.
The async attribute allows the browser to continue rendering the rest of your page while the API loads.
The key parameter contains your API key. You don't need your own API key when experimenting with this tutorial in JSFiddle. See Step 3: Get an API key for instructions on getting your own API key later.

<script>
  function initMap() {
  }
</script>

The initMap function initializes and adds the map when the web page loads. Use a script tag to include your own JavaScript which contains the initMap function.

getElementById

Add this function to find the map div on the web page.

new google.maps.Map()

Add this new Google maps object to construct a map in the div element.

{
  var uluru = {lat: -25.363, lng: 131.044};

  var map = new google.maps.Map(document.getElementById('map'), {
    zoom: 4,
    center: uluru
  });
}

Add properties to the map including the center and zoom level. See the documentation for other property options.
The center property tells the API where to center the map. The map coordinates are set in the order: latitude, longitude.
The zoom property specifies the zoom level for the map. Zoom: 0 is the lowest zoom, and displays the entire earth. Set the zoom value higher to zoom in to the earth at higher resolutions.

var marker = new google.maps.Marker({
  position: uluru,
  map: map});

Add this code to put a marker on the map. The position property sets the position of the marker.

Step 3: Get an API key

This section explains how to authenticate your app to the Google Maps JavaScript API using your own API key.
Follow these steps to get an API key:
  1. Go to the Google API Console.
  2. Create or select a project.
  3. Click Continue to enable the API and any related services.
  4. On the Credentials page, get an API key (and set the API key restrictions).
    Note: If you have an existing unrestricted API key, or a key with browser restrictions, you may use that key.
  5. To prevent quota theft, secure your API key following these best practices.
  6. (Optional) Enable billing. See Usage Limits for more information.
  7. Copy the entire code of this tutorial from this page, to your text editor. If you don't already have a text editor, here are some recommendations: You can use: Notepad++ (for Windows); TextEdit (for macOS); gedit, KWrite, among others (for Linux machines).
  8. Replace the value of the key parameter in the URL with your own API key (that's the API key that you've just obtained).
    <script src="https://maps.googleapis.com/maps/api/js?key=YOUR_API_KEY&callback=initMap"
      async defer>
    </script>
    
  9. Save this file with a name that ends with .html, like google-maps.html.
  10. Load the HTML file in a web browser by dragging it from your desktop onto your browser. Alternatively, double-clicking the file works on most operating systems.

Tips and trouble-shooting

  • Use the JSFiddle interface to display HTML, CSS and JavaScript code in separate panes. You can run the code and display output in the Results pane.
  • You can tweak options like style and properties to customize the map. For more information on customizing maps, read the guides to styling, and drawing on the map.
  • Use the Developer Tools Console in your web browser to test and run your code, read error reports and solve problems with your code.
    Keyboard shortcuts to open the console in Chrome: Command+Option+J (on Mac), or Control+Shift+J (on Windows).