

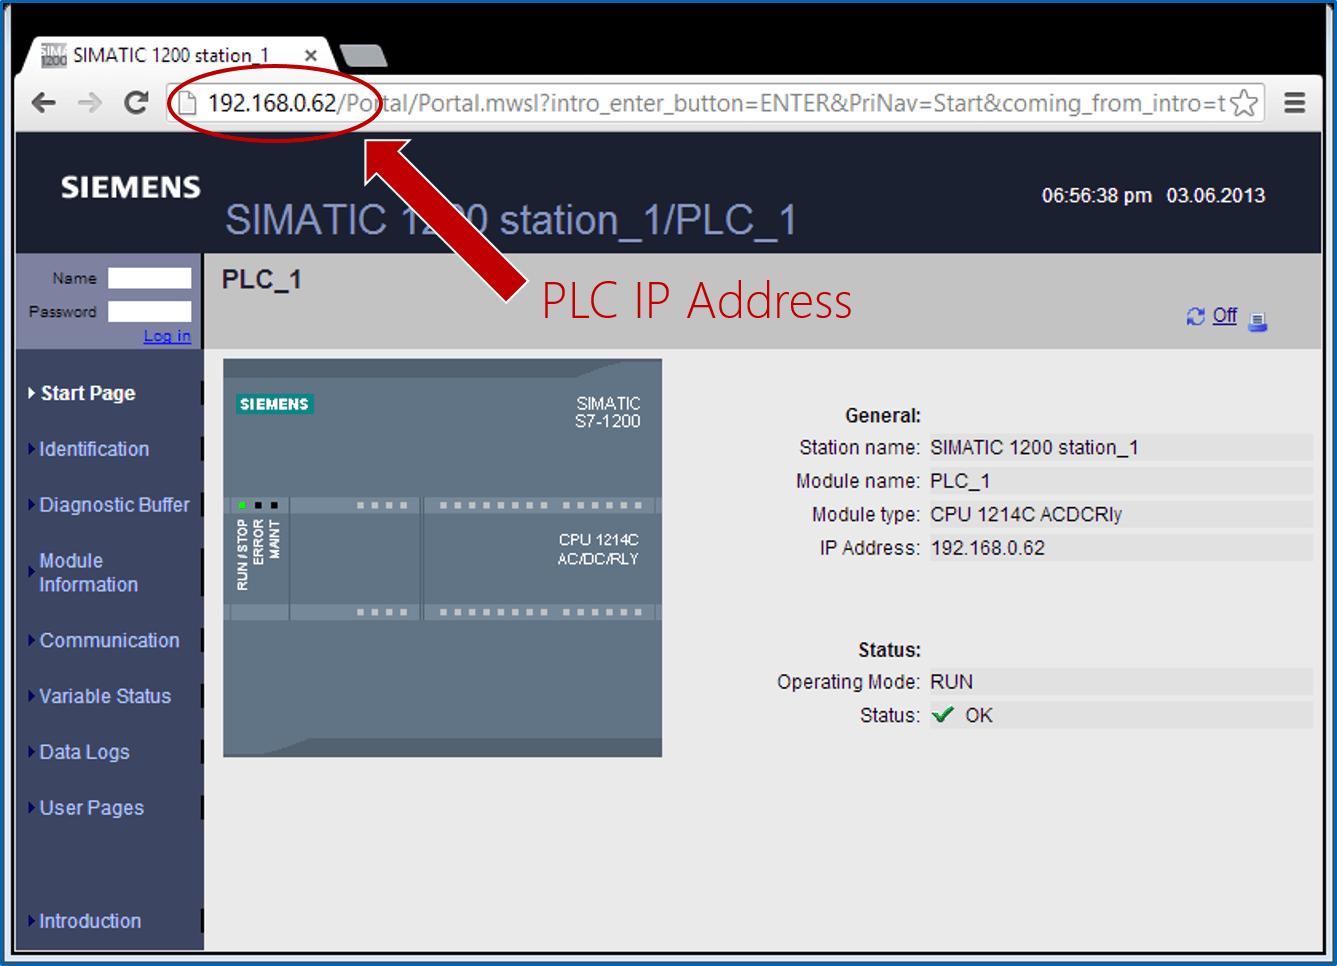
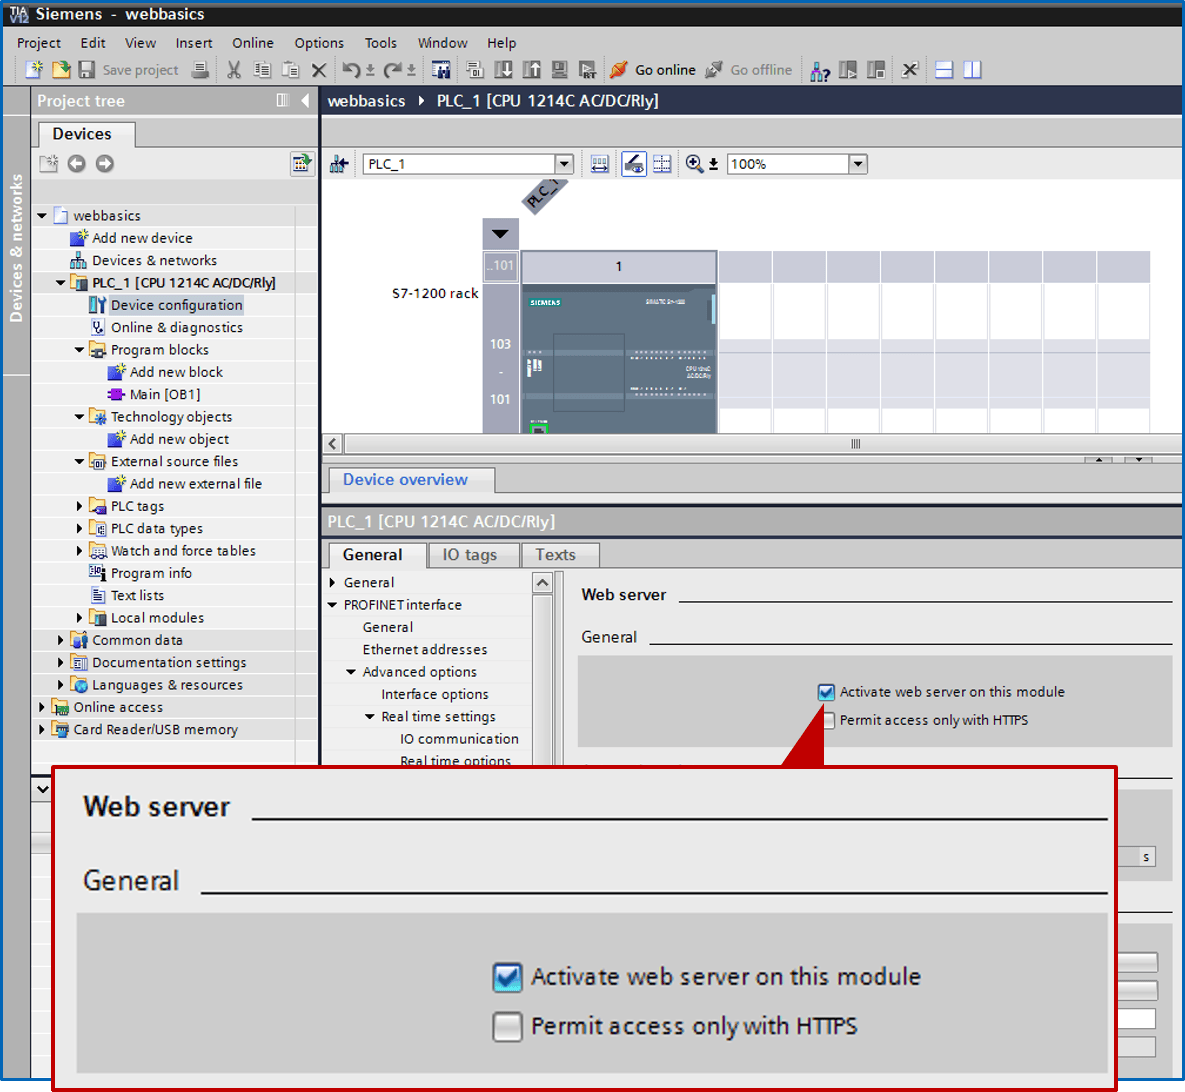
Step 1. Turn on the web server. To do this, navigate to the web
server menu in the device configuration page and check the box to enable
the web server.

Step 2: Download your project to your PLC and browse to its IP address using your web browser. You will see the default Siemens PLC Web server.
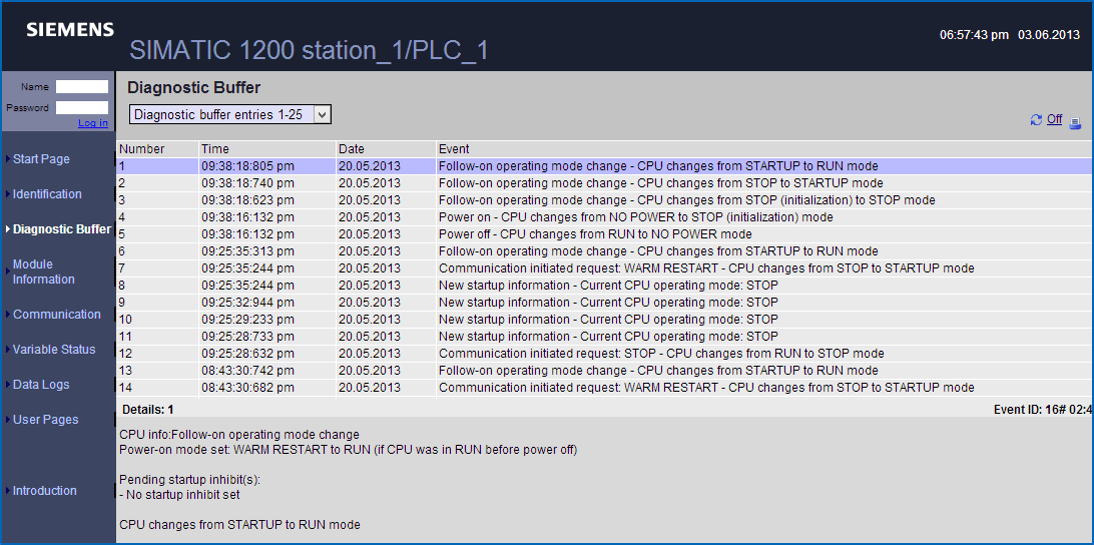
You can view the Diagnostic Buffer. This is really helpful.
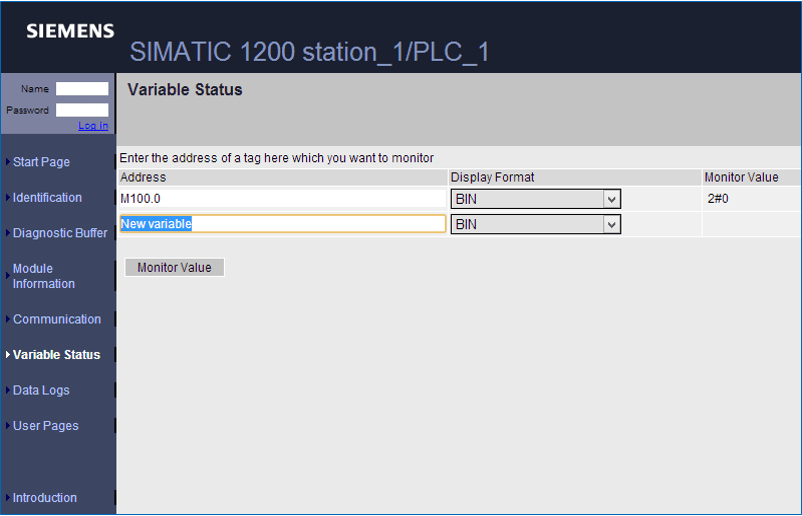
The variable status page allows you to view and modify PLC tags. This is great for debugging, but be careful. You will be directly editing PLC values!
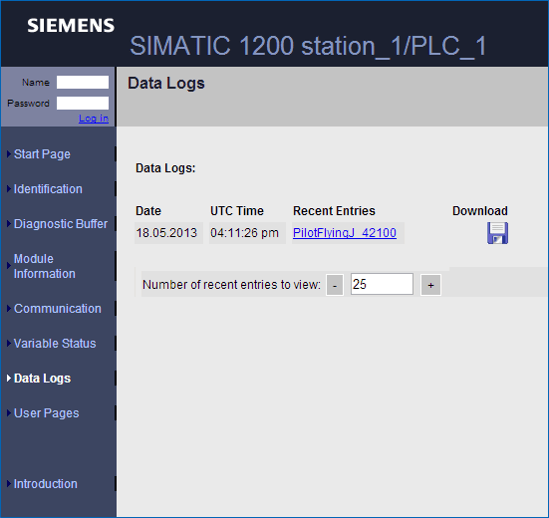
If your PLC is configured to save data logs, you can easily download the log files from the Data Logs page and open them in Excel.
The default website is perfect for troubleshooting and looks great on a tablet.

User Pages
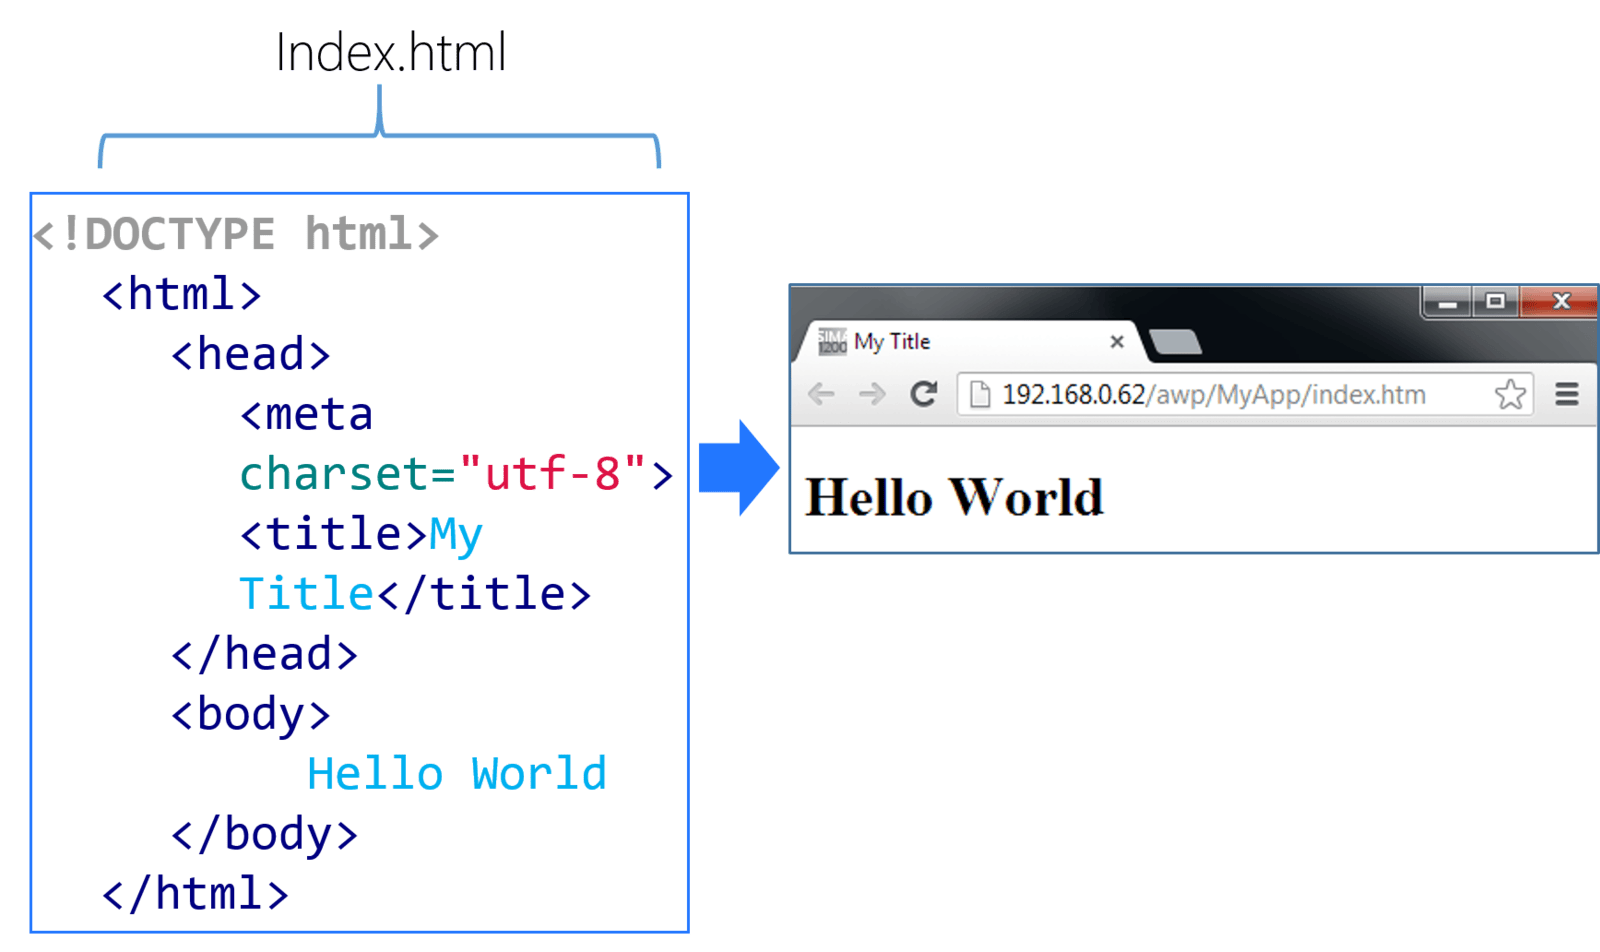
Before enabling User-defined pages in the PLC, we need to create an HTML file for our user page. Create a text file called "index.htm" and save it to a folder on your computer (i.e. "C:\UserPages").
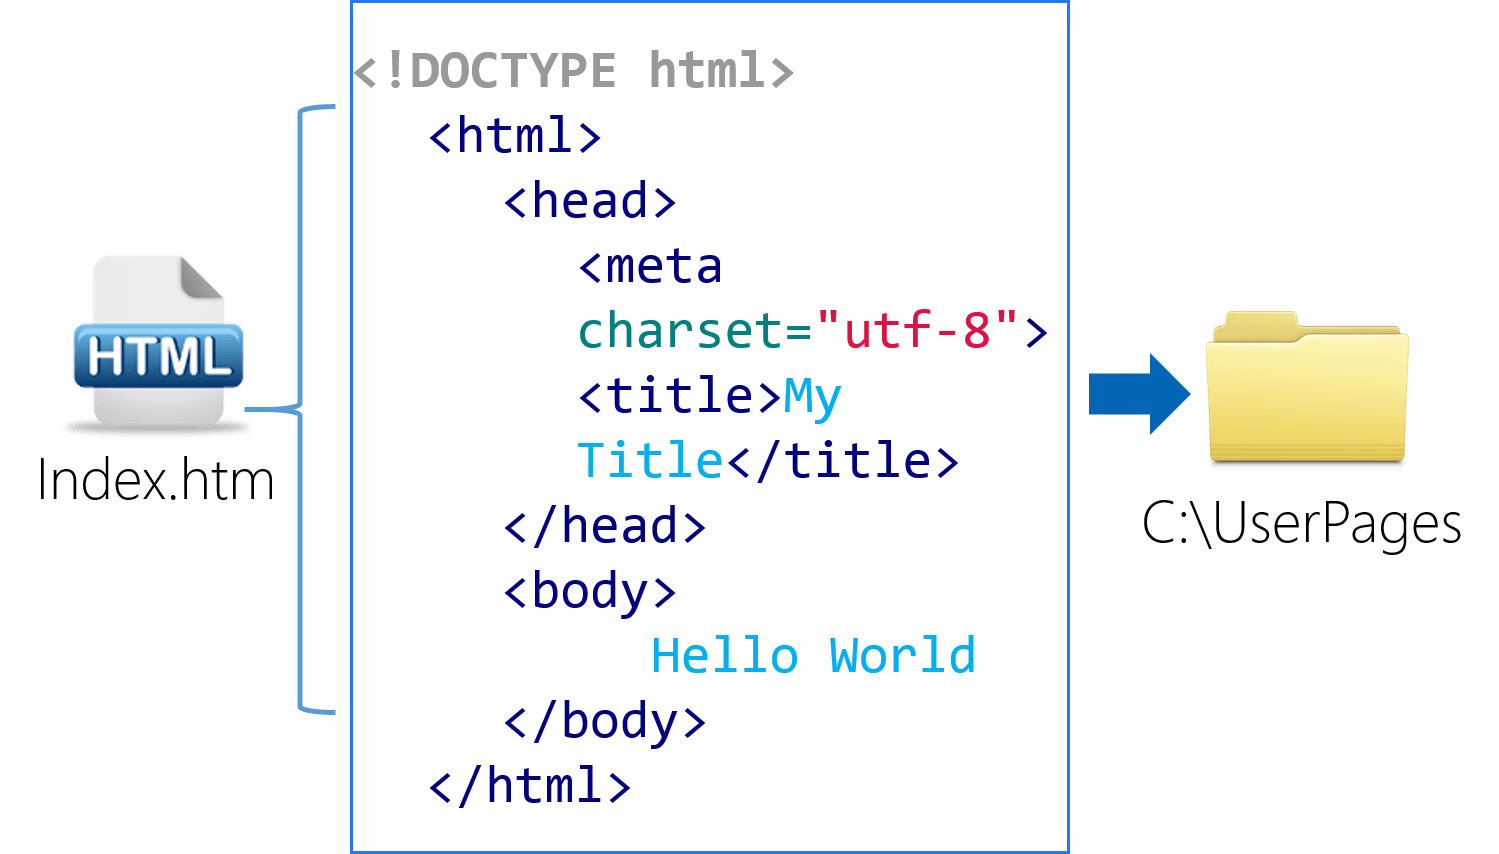
The file contents should look like this:
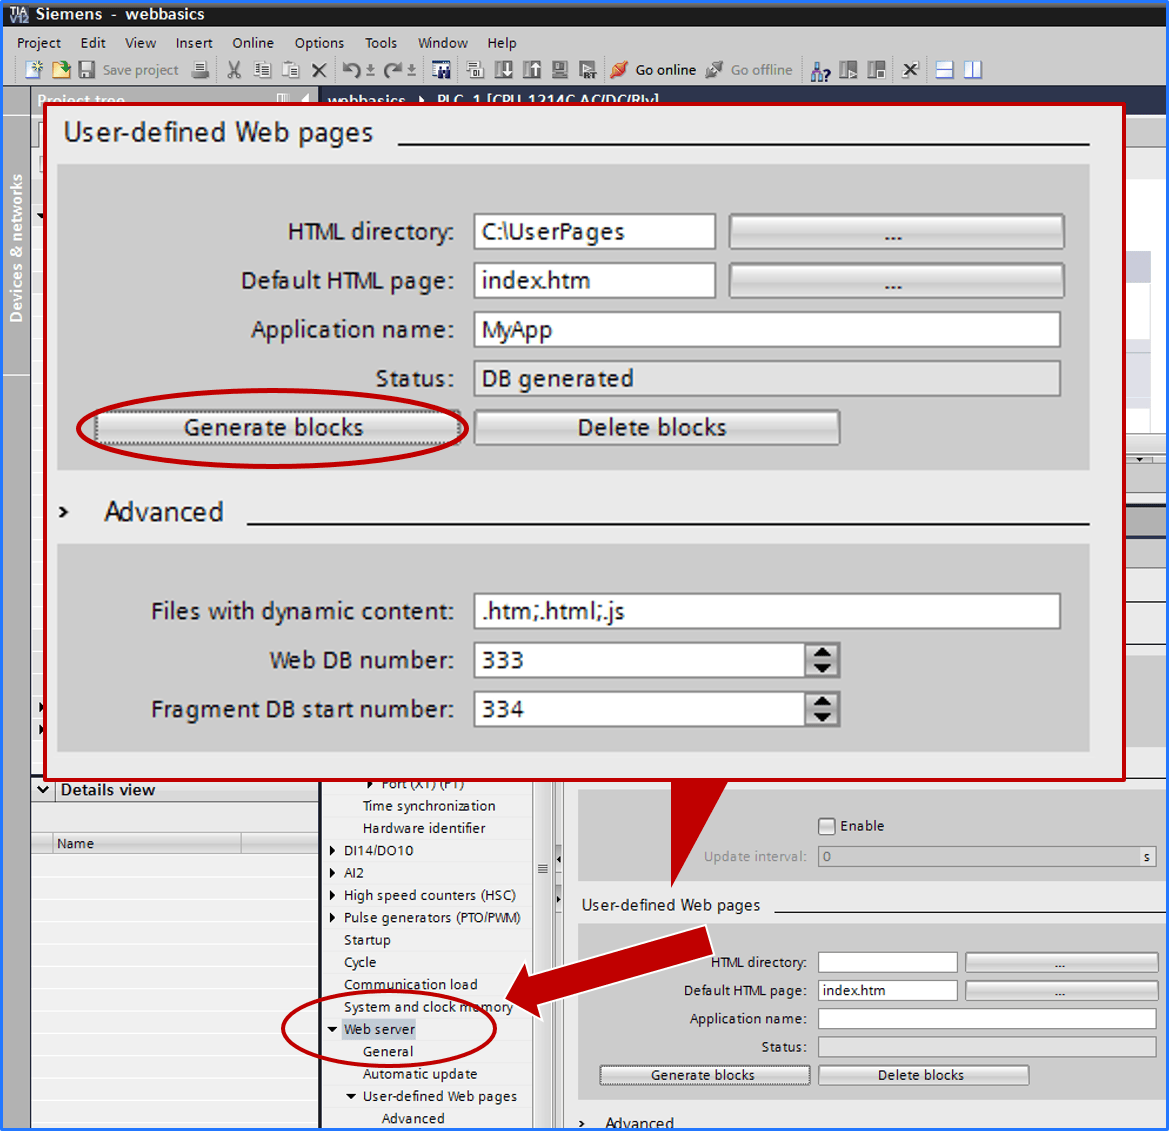
Now we can enable the user pages and use this file we created. To enable user pages, navigate to the device configuration -> Web server -> User-defined Web pages. Set the HTML Directory to the folder you created and the Default HTML page to the file you created. Then click Generate Blocks to compile the user page:
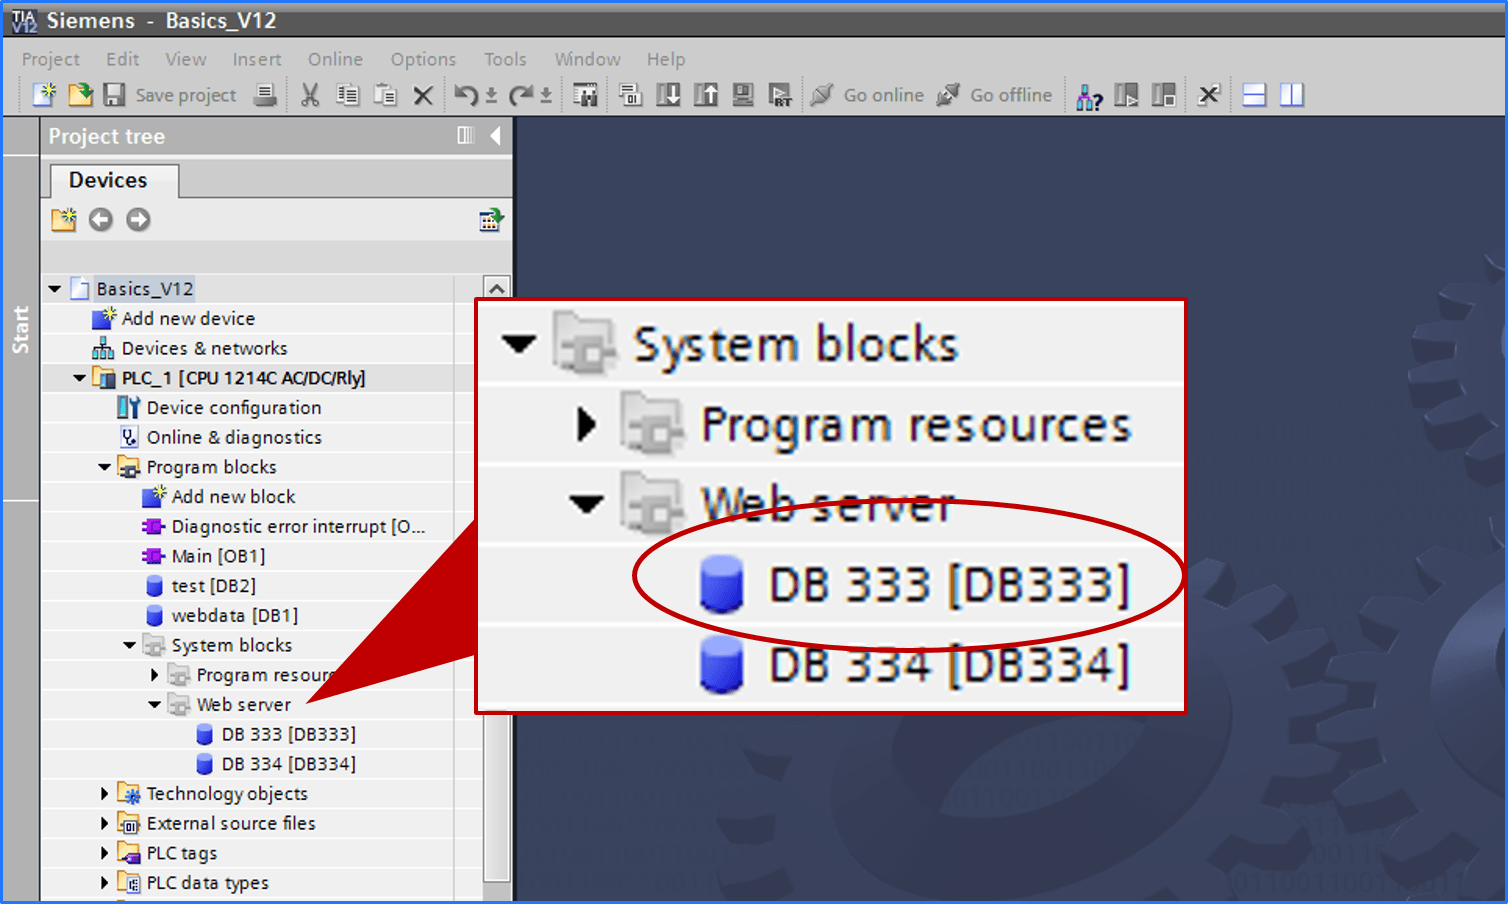
You will notice that the "Generate Blocks" function creates two new data blocks in your project, and you may be wondering what these are for.
Fragments
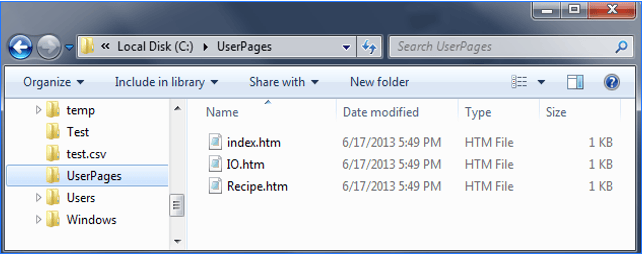
Fragments are the name given to each file in your user pages folder. Initially we just created a single "index.htm" file, but let's suppose you had several files in this folder. It would look something like this:
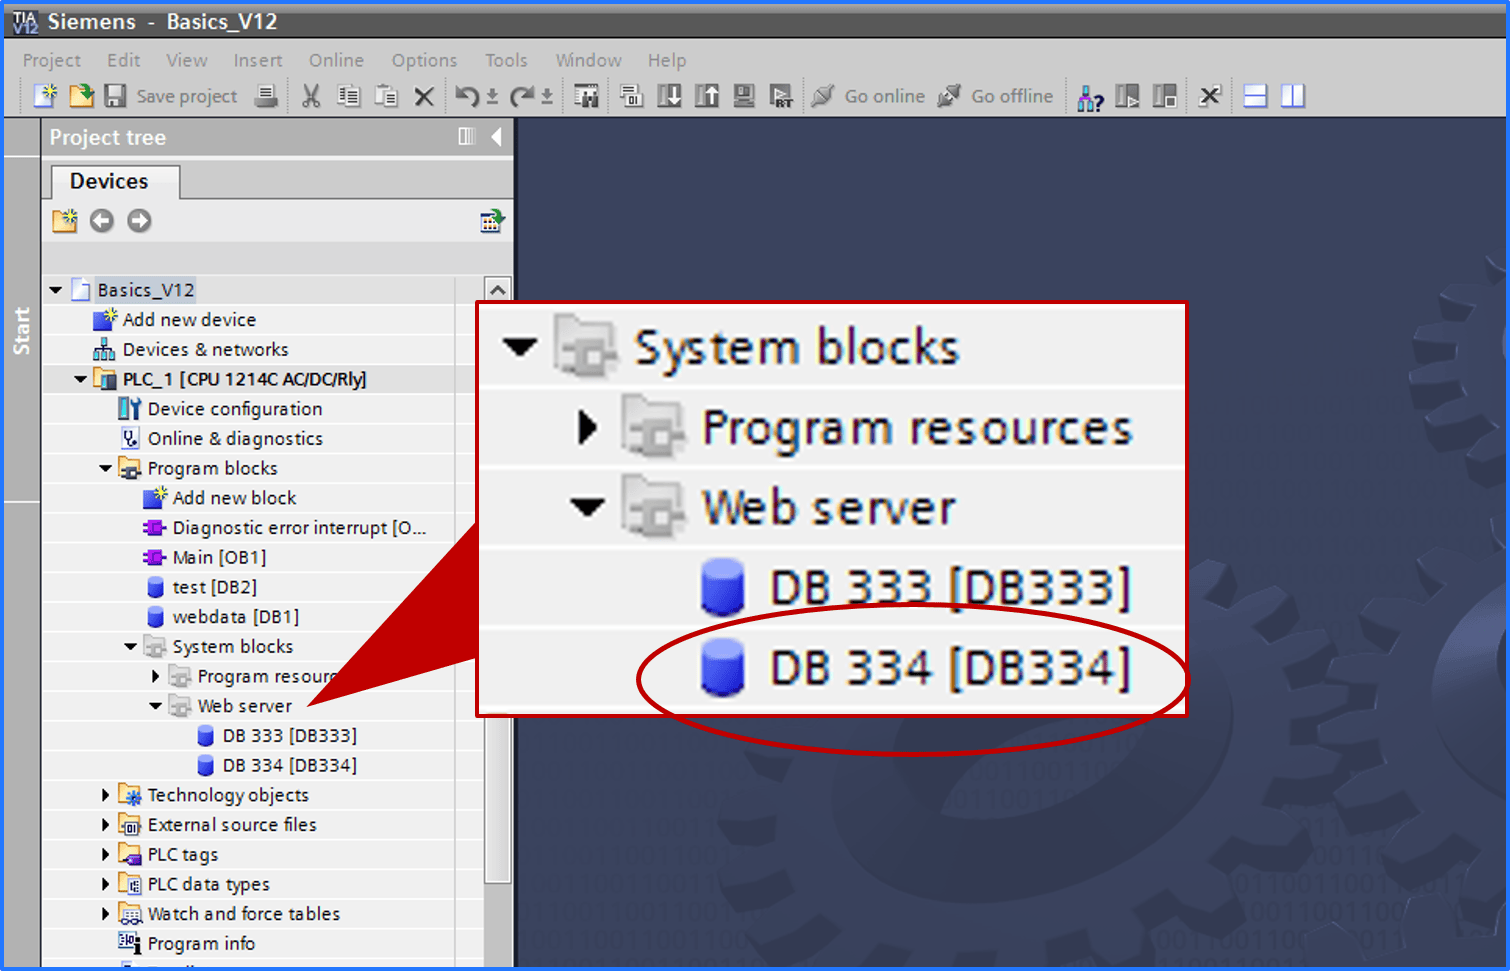
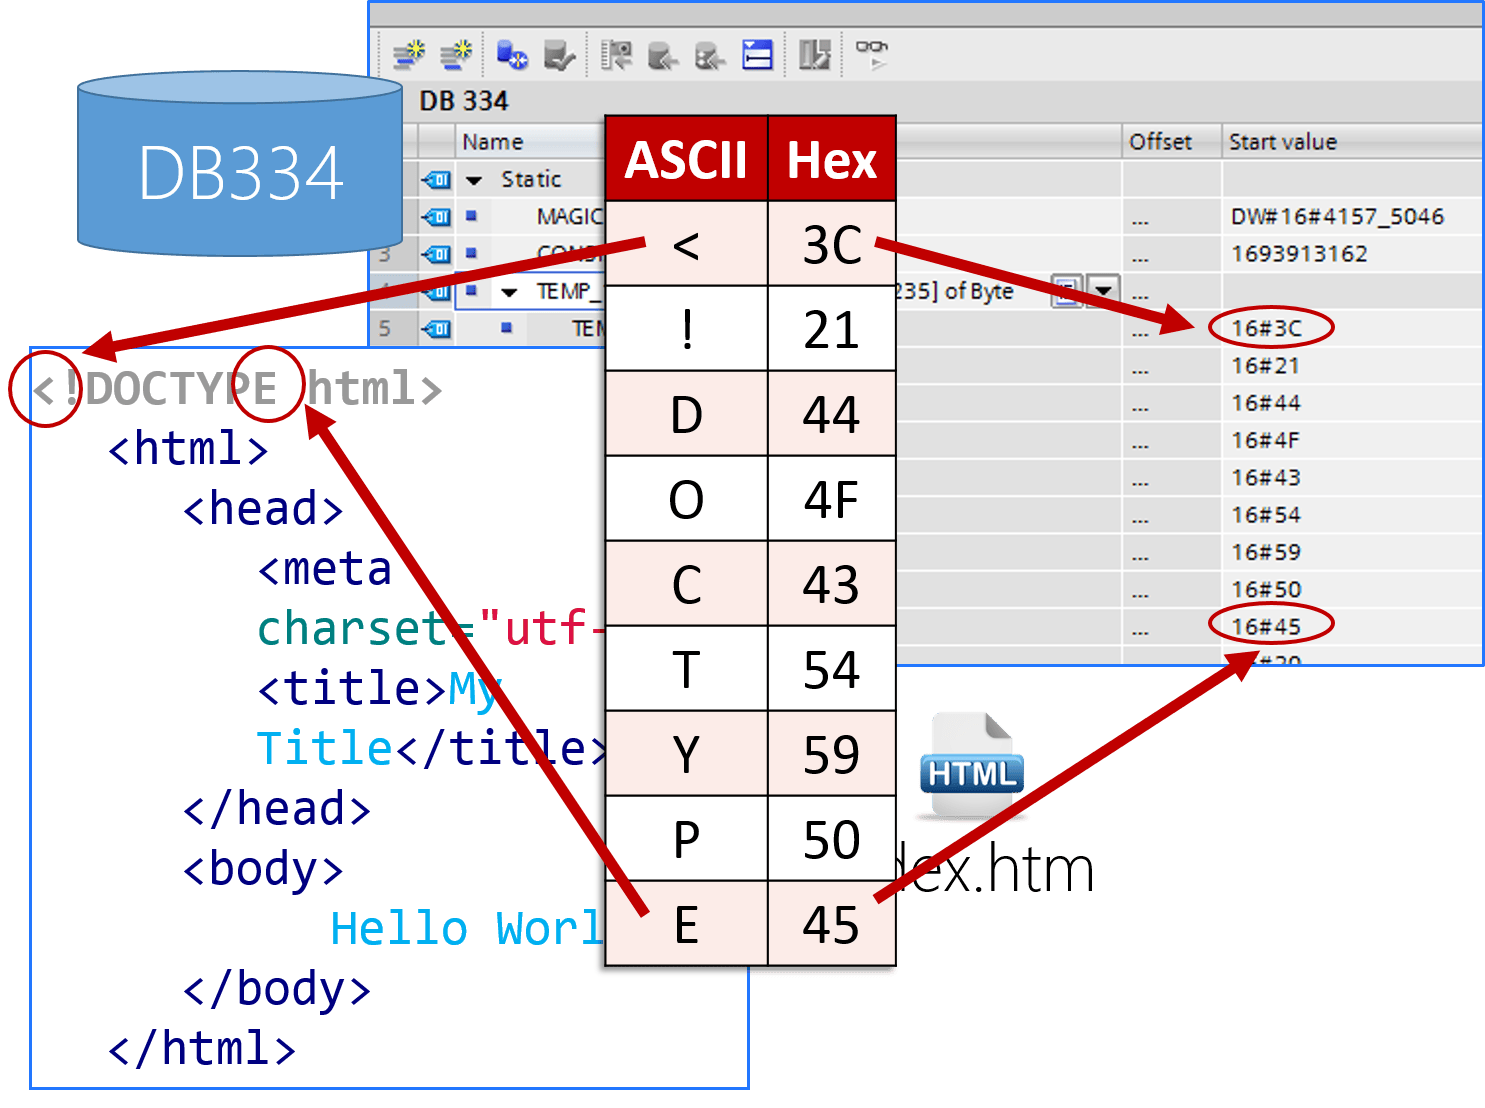
When you click the "Generate Blocks" button, the compiler takes all of these files and copies each byte into an array in the element of the Fragment data blocks. The first Fragment DB starts at DB334. An array is dimensioned for each file.

Below you can see how each byte from the file is packed into the array:
As you add more files to your folder, you may exceed the maximum number of bytes that can be contained in a data block, when this happens, another sequential data block is created. You can include HTML files, JavaScript, CSS Files, and even image files. They will all get converted into data block fragments:

WWW Function
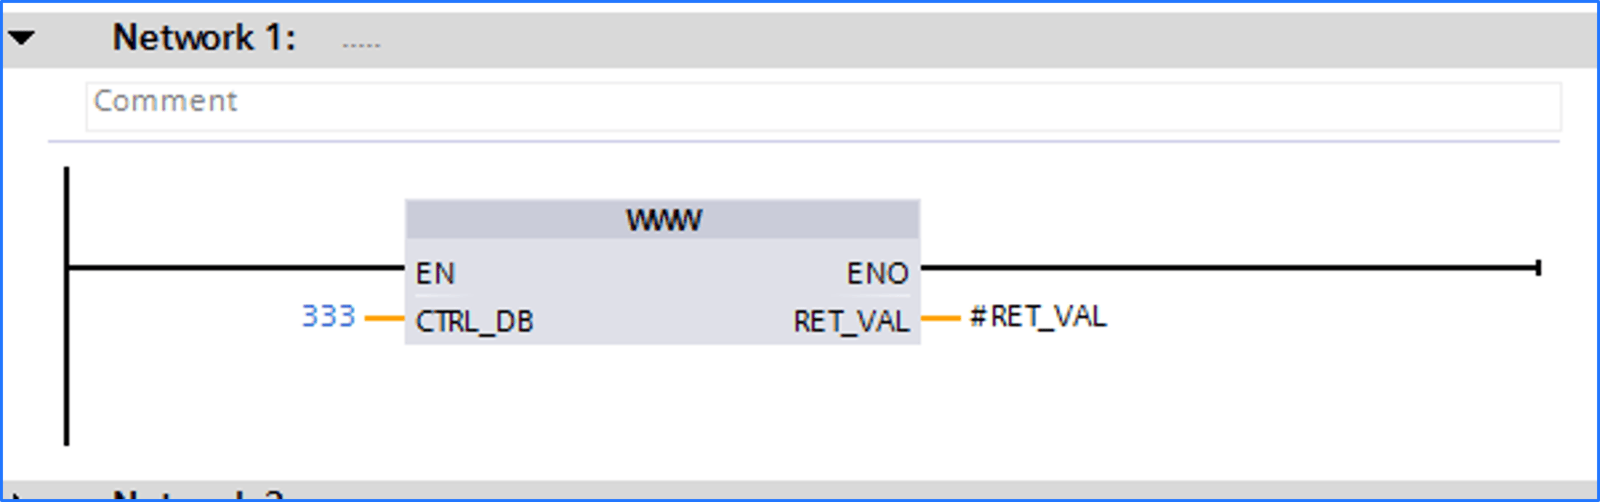
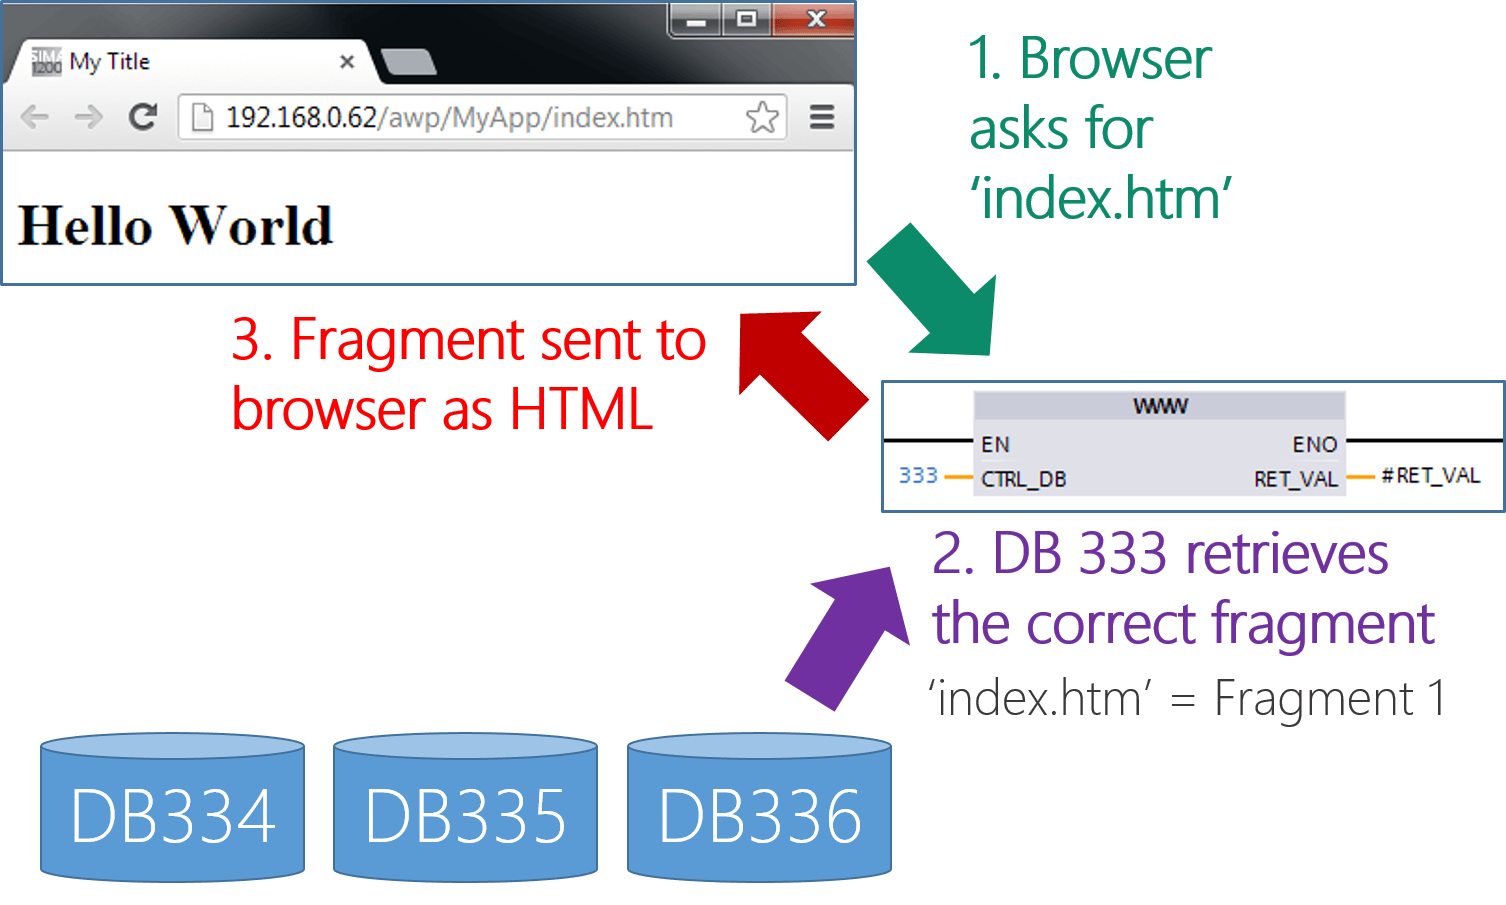
In order for user pages to work, you have to call the WWW Function in your project. Recall the DBs created by the "Generate Blocks" function. We already know that DB334 stores the fragments. DB333 is used in conjunction with the WWW Function to control the retrieval and delivery of the fragments:
Insert the WWW Function into your code. Compile and download your project.
This function process requests from the browser and synchronizes the data in the User Pages. It handles retrieving the correct fragment from the Fragment data blocks as shown below:
If you browse to the IP Address of your PLC, you will see the main Siemens Web server login page. There is a link on the left for User Pages. The name in the hyperlink matches the Application name you specified in the User-defined Pages config screen in TIA Portal:
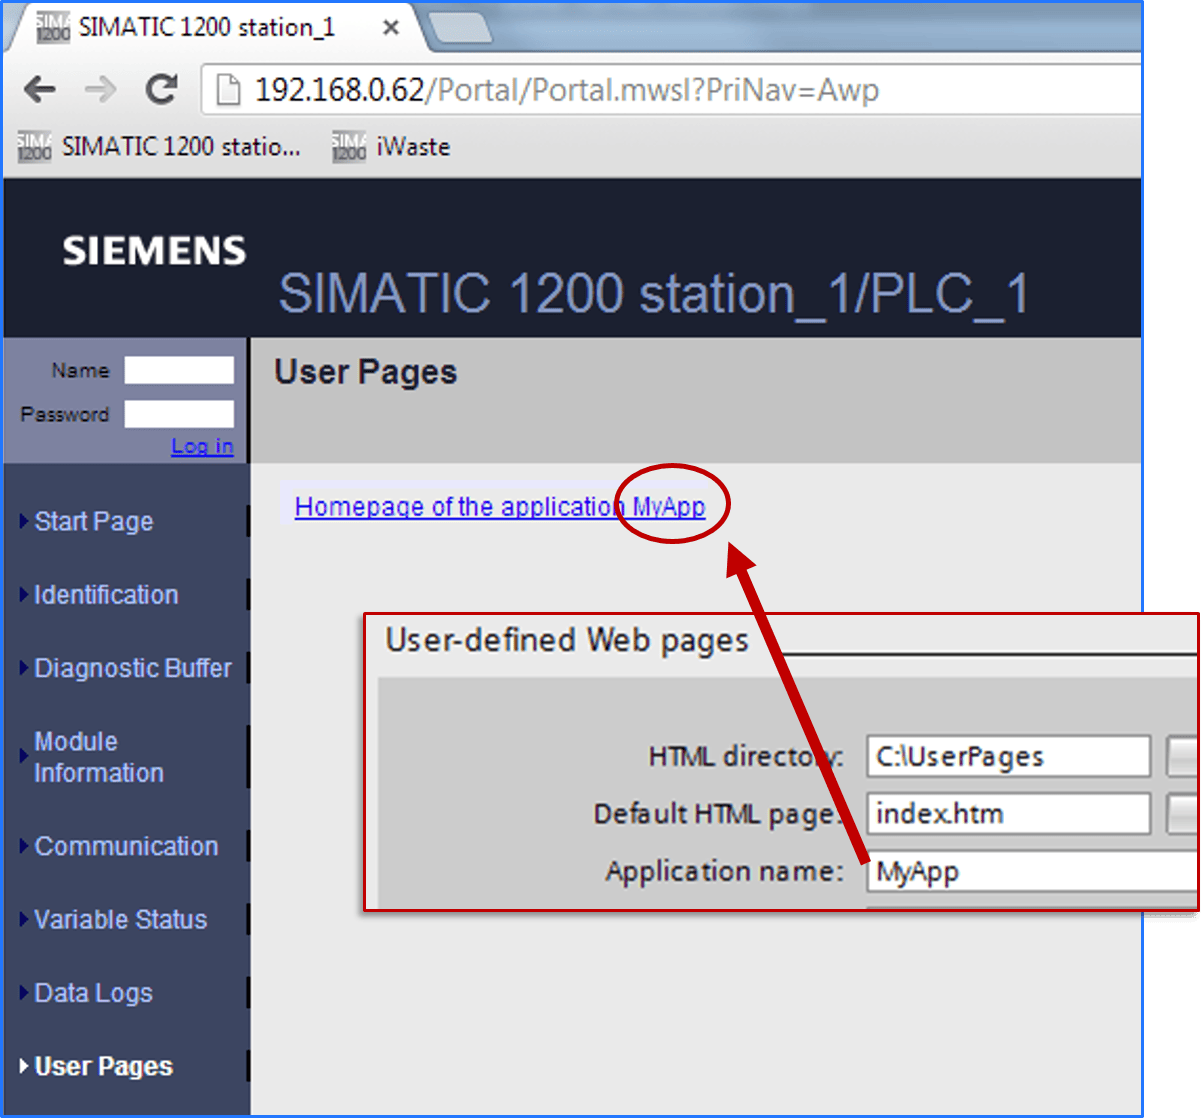
If you click this link, you will see your Hello World page:
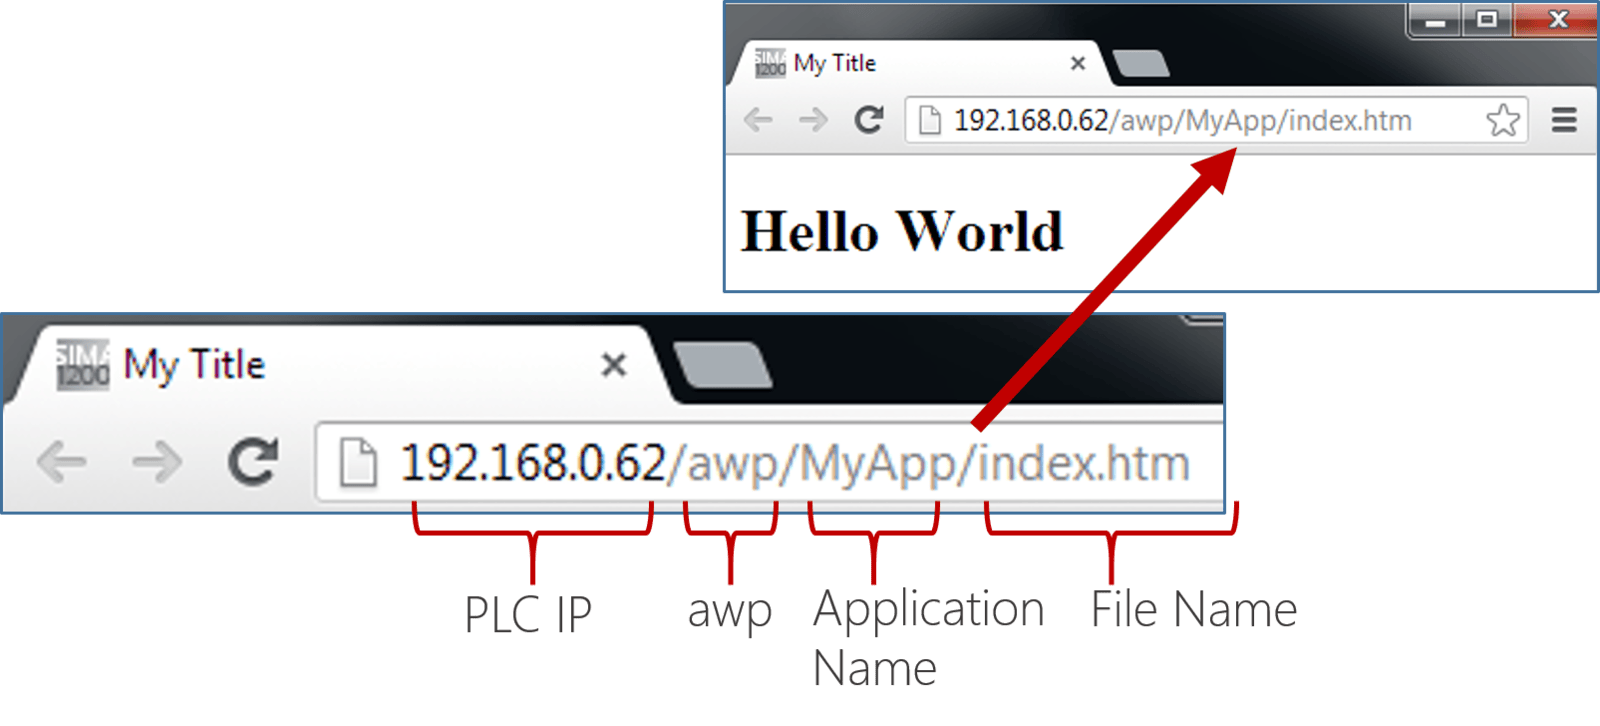
The format of the User-defined web page URL is as follows. I'm not sure what "awp" means, but it is a required part of the URL:
Reading PLC Data
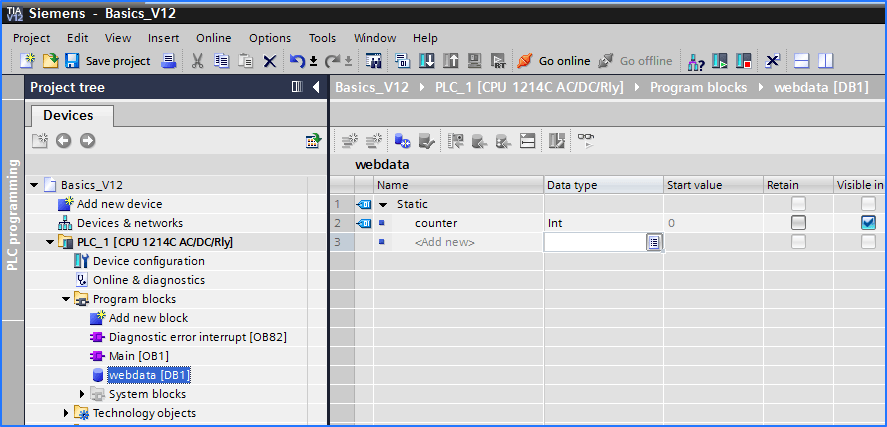
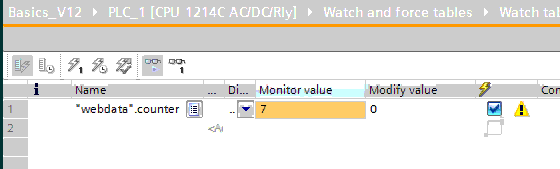
In order to read PLC data we need to modify our file to include a special reference to the tag we are trying to read. First create a data block called "webdata" and add define an integer variable called "counter." In your PLC, add some code to make this increment around every second:
Download your project and then go online with the PLC to verify that the value is incrementing:
Now modify your "index.htm" as follows:
Notice the tag name is prefixed with ":=" and suffixed with ":" This
is the key to injecting variables into the user page. When the page is
rendered it will replace the token with the actual PLC tag value.
Next click the "Generate Blocks" button in the Webserver config and download the program to the PLC. When you browse to the user page, you will see the counter value update when the page is refreshed. Notice how the page flickers when refreshed. This can be annoying if you are trying to make your web page look and feel like a traditional HMI.
Below is an example of how annoying these page refreshes can be. If you have an image on your page it will flicker as the page is refreshed. In the example below, the page is automatically refreshed by adding a specific meta-tag to the HTML header.
Reading Data Using Javascript
To avoid the annoying page flickering, we need to employ some JavaScript to read the data and refresh the screen in the background.
To demonstrate this, the first step is to move the PLC tags from our main page to a new page. The new page will not contain any HTML, it will just be a simple HTML file with a single tag reference. Create a new file and name it something like "IOCounter.htm" (I am prefixing the name with "IO" to remind myself that this file is used for data Input and Output). The contents of your original "index.htm" should be modified as shown below. Notice that we moved the tag reference :="webdata".counter: to a new file called "IOCounter.htm" and replaced it with a label with the id="counter." We also included the popular JavaScript library JQuery. You will need to download JQuery and copy it to your "UserFiles" directory. My "UserFiles" directory looks like this:
IOCounter.htm
Index.htm:
The JavaScript function above retrieves the current tag value by requesting the contents of the file "IOCounter.htm" and then using this value to set the text of the Label with id="counter." This code runs automatically every second using the JavaScript setInterval function. The process is illustrated below:
In the simple example above, we placed a single tag value in the file "IOCounter.htm". A more advanced option would be to put several tags in this file and format the text into a JSON structure. This would allow you to update several tags on the screen using just one external data file. Be careful though, as you add more tags to an HTML page, the page loading time increases.
Modifying PLC Tags From the Browser
A user web page would not be very helpful without allowing the user to modify PLC values. The following HTML page illustrates the simplest way of editing PLC tag values. The special comment field (AWP_In_Variable) at the top tells the PLC which tags are allowed to be modified. You will not be able to edit the tag values unless you include this comment for each tag.
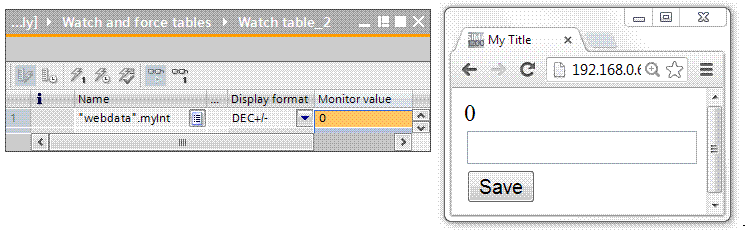
First create a new variable in the "webdata" DB:po
Then modify "index.htm" as follows:
The PLC will not allow you to modify values unless you are logged-in. Make sure to log in before navigating to the editor page you just created. The default user name is admin and the default password is blank so you can leave that field empty.
After you have logged-in, browse to the page and go online with the PLC. You should be able to edit the tag value using the web page you just created. Notice how the page flickers when the save button is pressed. This is because a post-back is occurring and the page gets refreshed.
In order to update PLC tags without experiencing the post-back, we can use some more JavaScript to update the value in the background. First we need to create another HTML file and move our tag reference to it.
In order to illustrate this, create a new variable in the "webdata" DB called triangleWave. Then write some code to make this value count up to 100 and then back down to -100, or whatever logic you like. Next create a new file called "IOtriangleWave.htm" that looks like this:
"IOtriangleWave.htm"
The comment field tells the PLC that the triangleWave variable is editable and the :="webdata".triangleWave: allows us to query the current value of the variable by requesting the contents of "IOtriangleWave.htm".
Now modify "index.htm" as follows:
We also added an image to the file to show that the data is being read and written without any flickering or page refreshes:
Server Side Logic - String Variables
Full-featured web servers have powerful server-side engines that can dynamically generate HTML pages. The Siemens PLC has a small embedded server, but there are still a few server-side things that can be done.
Up to this point, we have been experimenting with integer tag values. If you embed a string tag into your page and include some HTML formatting in the string value, it will render as HTML. Notice below that the string value is not displaying the exact values typed, but rather rendering as HTML:
Below are the HTML values that were assigned to the string tag above:
Server Side Logic - Delayed Delivery
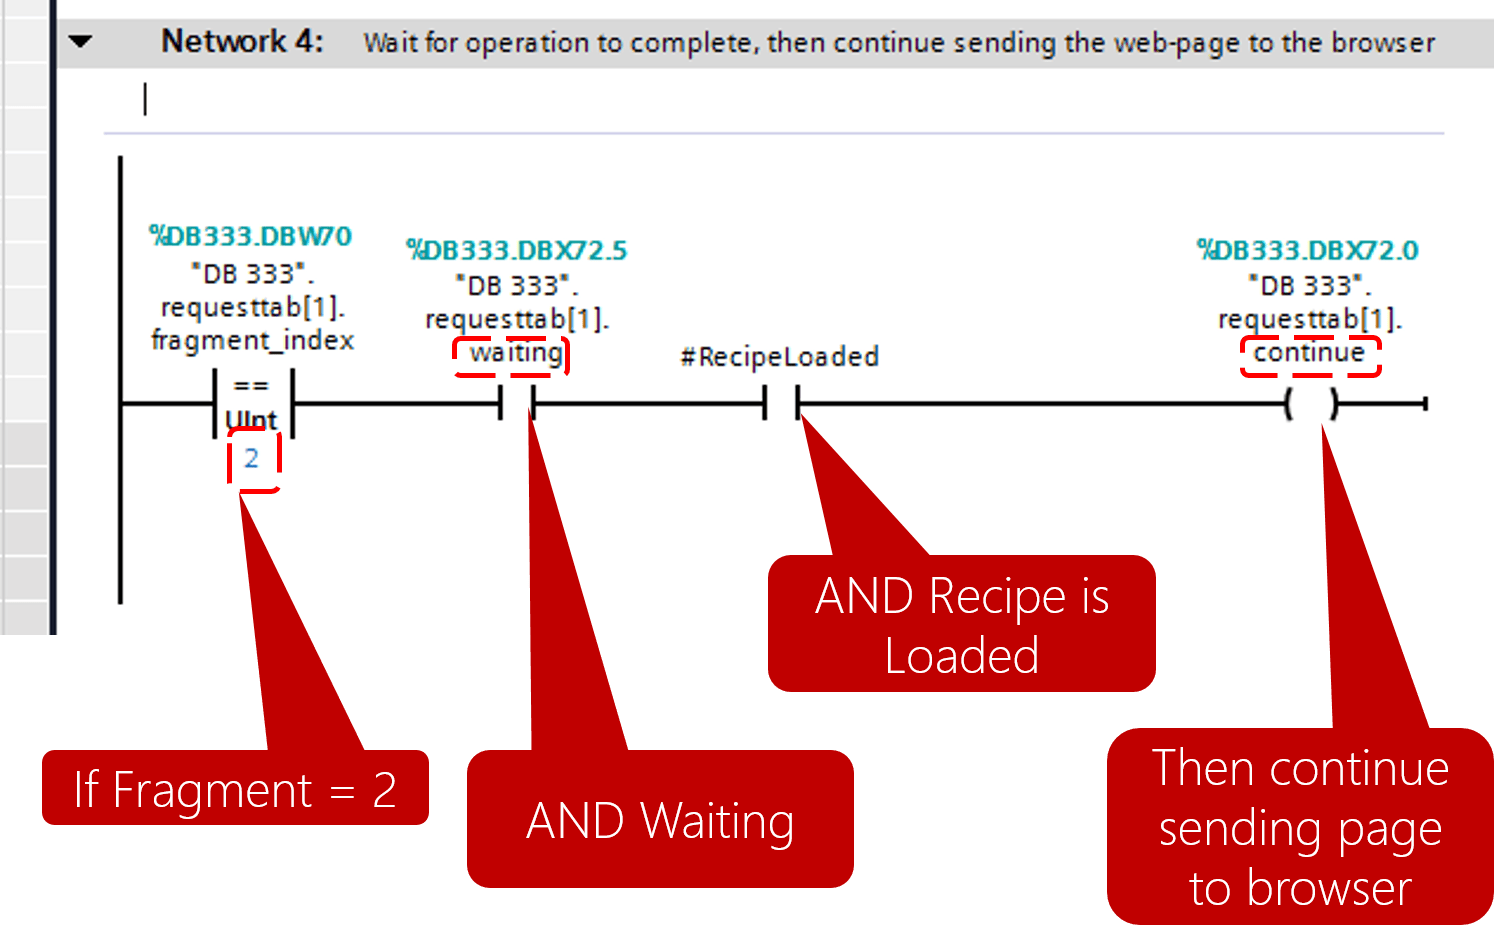
Another technique that is very powerful for performing server-side logic is Delayed Delivery. This is a technique that uses the WWW Function (in conjunction with DB333) to make the web-server wait before returning a requested page to the user. This allows the PLC to ensure that tag values are properly updated before being rendered on the web page. A typical example would be a recipe editor web page. The user selects a recipe from a dropdown box (which will cause a post-back and a page refresh). We must ensure that the new recipe values have been loaded into the PLC tags before refreshing the page. Normally the compiler automatically assigns a fragment number for each user-generated file. In order to control the delivery of pages (i.e. fragments), we must specify a fragment number in the HTML file as shown below:
Adding this special comment to the top of your HTML file tells the compiler to use fragment #2 for this file. You can specify the fragment number by setting the ID field to the desired number.
Now that we know our file will be fragment #2, we can control the delivery of the page to the browser. Below is a typical rung of ladder logic for implementing the delayed delivery of the page. In my example, the "continue" bit does not become true until the recipe loading is complete. In my case, the loading of a recipe required several PLC scans, so I needed to delay the page delivery until the recipe was loaded. Note that the PLC can support several simultaneous connections. If your application will support several simultaneous browser connections, you will have to replicate the code below for each index of the arrays shown. Currently only index 1 is handled in the code below.
 Below is an example showing the recipe loading screen. The user
selects a recipe from the drop-down which causes a PLC tag to be changed
and the browser waits for a post-back from the web server. The PLC
detects this change and starts loading the recipe (which takes several
PLC scans). The web-server waits for the continue bit to be set before
returning the page (fragment) is delayed until the recipe is loaded.
This ensures that the tag values injected into the HTML page will be
updated with the correct values before being sent to the browser. Below
is a demonstration of this in action:
Below is an example showing the recipe loading screen. The user
selects a recipe from the drop-down which causes a PLC tag to be changed
and the browser waits for a post-back from the web server. The PLC
detects this change and starts loading the recipe (which takes several
PLC scans). The web-server waits for the continue bit to be set before
returning the page (fragment) is delayed until the recipe is loaded.
This ensures that the tag values injected into the HTML page will be
updated with the correct values before being sent to the browser. Below
is a demonstration of this in action:

Conclusion
Knowing the basics and a few advanced tricks will enable you to create fully featured web pages served from a Siemens PLC. If you are comfortable with JavaScript, you can do some pretty amazing things and make a web page that looks and feels as good as a traditional HMI. Below is a simple example showing graphing, gauges, user input, and pop-up alerts. This looks and feels like a native app when running on my iPad or Android tablet. Click on the image below to see it in action. Happy coding!
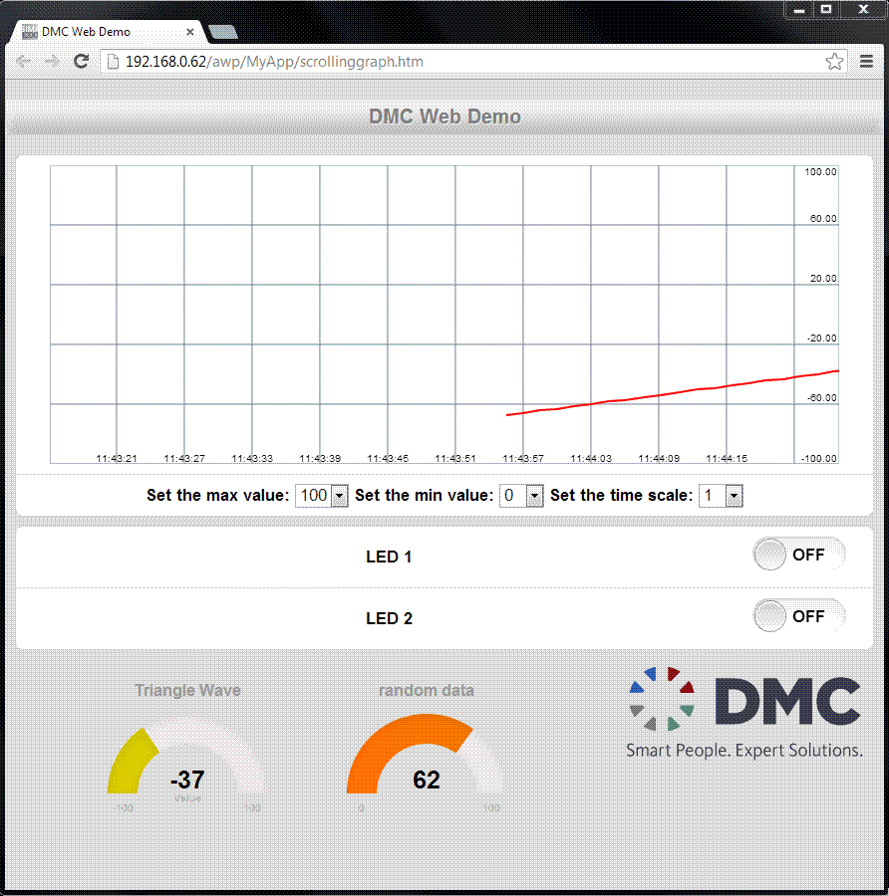
EDIT: Below is a simple example of how to to use the gages shown in the demo above. The gage javascript library is from HTTP://justgage.com. The example below references the IOTriangleWave.htm that we created above.
Step 2: Download your project to your PLC and browse to its IP address using your web browser. You will see the default Siemens PLC Web server.
You can view the Diagnostic Buffer. This is really helpful.
The variable status page allows you to view and modify PLC tags. This is great for debugging, but be careful. You will be directly editing PLC values!
If your PLC is configured to save data logs, you can easily download the log files from the Data Logs page and open them in Excel.
The default website is perfect for troubleshooting and looks great on a tablet.
User Pages
Before enabling User-defined pages in the PLC, we need to create an HTML file for our user page. Create a text file called "index.htm" and save it to a folder on your computer (i.e. "C:\UserPages").
The file contents should look like this:
<!DOCTYPE html><html lang="en"> <head> <meta charset="utf-8"> <title>My Title</title> </head> <body> Hello World </body></html>Now we can enable the user pages and use this file we created. To enable user pages, navigate to the device configuration -> Web server -> User-defined Web pages. Set the HTML Directory to the folder you created and the Default HTML page to the file you created. Then click Generate Blocks to compile the user page:
You will notice that the "Generate Blocks" function creates two new data blocks in your project, and you may be wondering what these are for.
Fragments
Fragments are the name given to each file in your user pages folder. Initially we just created a single "index.htm" file, but let's suppose you had several files in this folder. It would look something like this:
When you click the "Generate Blocks" button, the compiler takes all of these files and copies each byte into an array in the element of the Fragment data blocks. The first Fragment DB starts at DB334. An array is dimensioned for each file.
Below you can see how each byte from the file is packed into the array:
As you add more files to your folder, you may exceed the maximum number of bytes that can be contained in a data block, when this happens, another sequential data block is created. You can include HTML files, JavaScript, CSS Files, and even image files. They will all get converted into data block fragments:
WWW Function
In order for user pages to work, you have to call the WWW Function in your project. Recall the DBs created by the "Generate Blocks" function. We already know that DB334 stores the fragments. DB333 is used in conjunction with the WWW Function to control the retrieval and delivery of the fragments:
Insert the WWW Function into your code. Compile and download your project.
This function process requests from the browser and synchronizes the data in the User Pages. It handles retrieving the correct fragment from the Fragment data blocks as shown below:
If you browse to the IP Address of your PLC, you will see the main Siemens Web server login page. There is a link on the left for User Pages. The name in the hyperlink matches the Application name you specified in the User-defined Pages config screen in TIA Portal:
If you click this link, you will see your Hello World page:
The format of the User-defined web page URL is as follows. I'm not sure what "awp" means, but it is a required part of the URL:
Reading PLC Data
In order to read PLC data we need to modify our file to include a special reference to the tag we are trying to read. First create a data block called "webdata" and add define an integer variable called "counter." In your PLC, add some code to make this increment around every second:
Download your project and then go online with the PLC to verify that the value is incrementing:
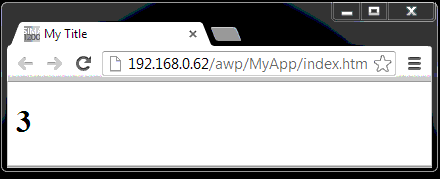
Now modify your "index.htm" as follows:
<!DOCTYPE html> <html> <head> <meta charset="utf-8"> <title>My Title</title> </head> <body> :="webdata".counter: </body></html>Next click the "Generate Blocks" button in the Webserver config and download the program to the PLC. When you browse to the user page, you will see the counter value update when the page is refreshed. Notice how the page flickers when refreshed. This can be annoying if you are trying to make your web page look and feel like a traditional HMI.
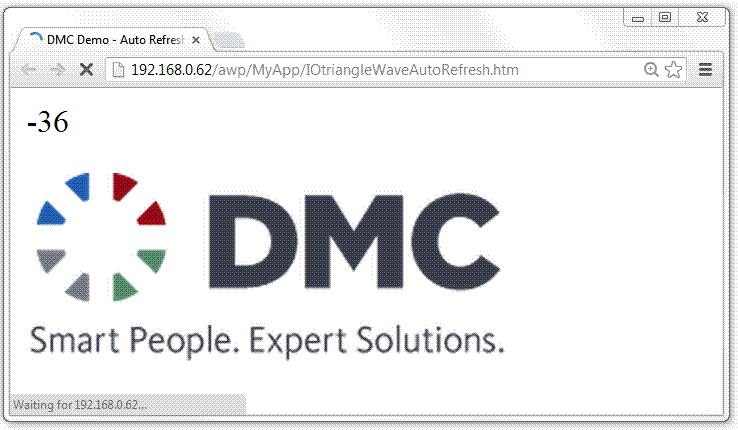
Below is an example of how annoying these page refreshes can be. If you have an image on your page it will flicker as the page is refreshed. In the example below, the page is automatically refreshed by adding a specific meta-tag to the HTML header.
<head> <meta charset="utf-8"> <meta http-equiv="refresh" content="1" > <!-- meta tag refreshes page every second --> <title>DMC Demo - Auto Refresh</title></head>Reading Data Using Javascript
To avoid the annoying page flickering, we need to employ some JavaScript to read the data and refresh the screen in the background.
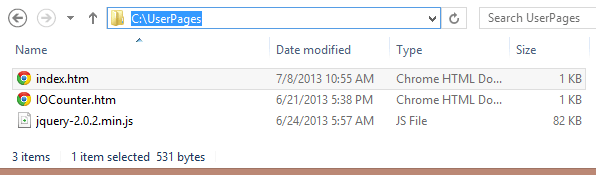
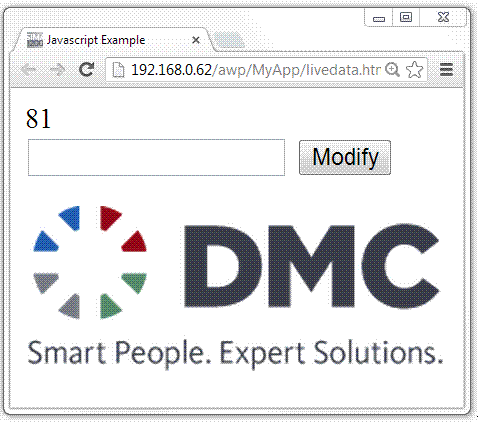
To demonstrate this, the first step is to move the PLC tags from our main page to a new page. The new page will not contain any HTML, it will just be a simple HTML file with a single tag reference. Create a new file and name it something like "IOCounter.htm" (I am prefixing the name with "IO" to remind myself that this file is used for data Input and Output). The contents of your original "index.htm" should be modified as shown below. Notice that we moved the tag reference :="webdata".counter: to a new file called "IOCounter.htm" and replaced it with a label with the id="counter." We also included the popular JavaScript library JQuery. You will need to download JQuery and copy it to your "UserFiles" directory. My "UserFiles" directory looks like this:
IOCounter.htm
:="webdata".counter:Index.htm:
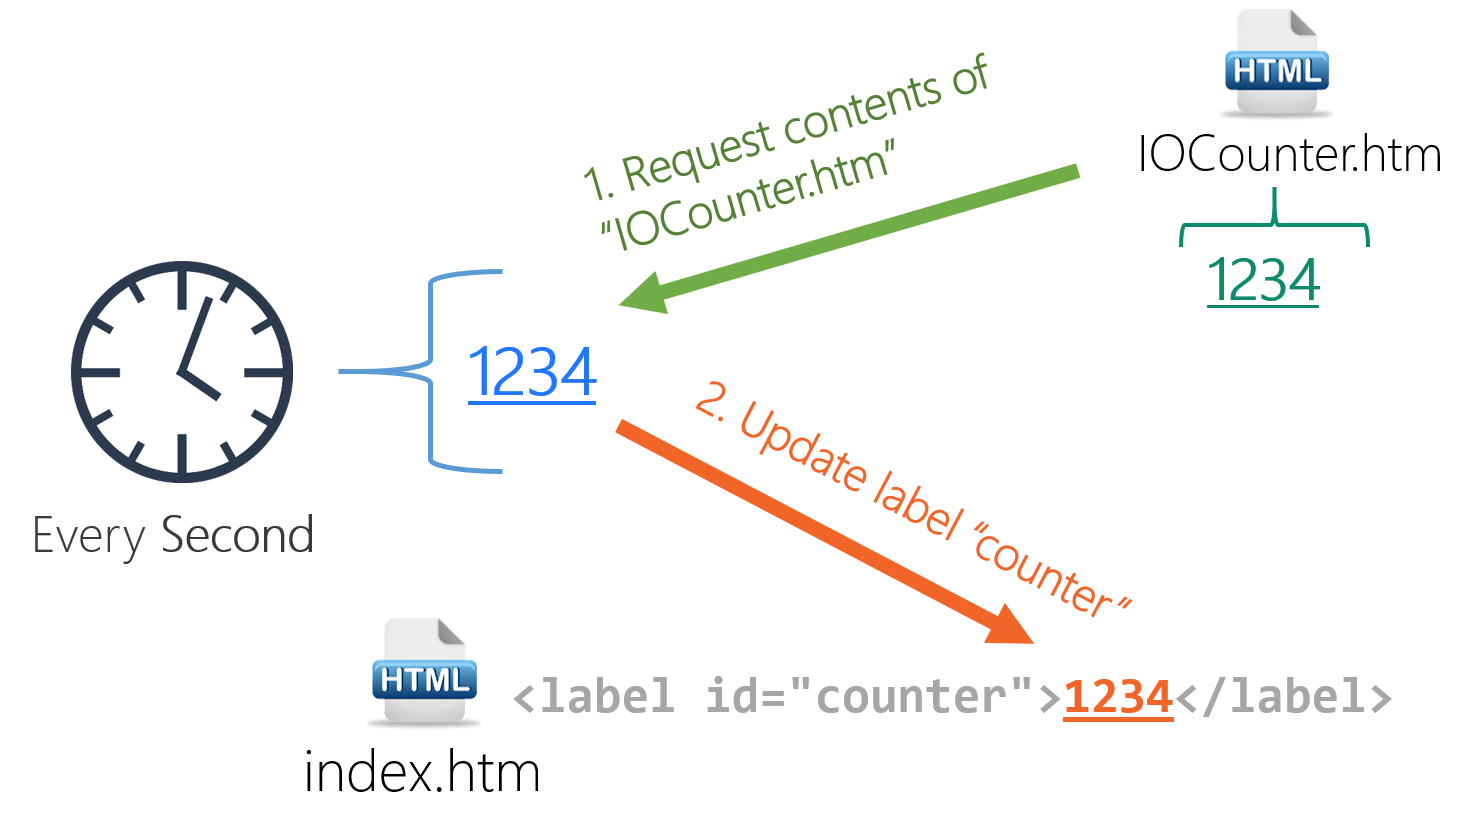
<!DOCTYPE html><html lang="en"> <head> <meta charset="utf-8"> <title>Javascript Example</title> <script src="jquery-2.0.2.min.js"></script> </head> <body> <label id="counter">0</label> </body> <script type="text/javascript"> $(document).ready(function(){ $.ajaxSetup({ cache: false }); setInterval(function() { $.get("IOCounter.htm", function(result){ $('#counter').text(result.trim()); }); },1000); }); </script></html>The JavaScript function above retrieves the current tag value by requesting the contents of the file "IOCounter.htm" and then using this value to set the text of the Label with id="counter." This code runs automatically every second using the JavaScript setInterval function. The process is illustrated below:
In the simple example above, we placed a single tag value in the file "IOCounter.htm". A more advanced option would be to put several tags in this file and format the text into a JSON structure. This would allow you to update several tags on the screen using just one external data file. Be careful though, as you add more tags to an HTML page, the page loading time increases.
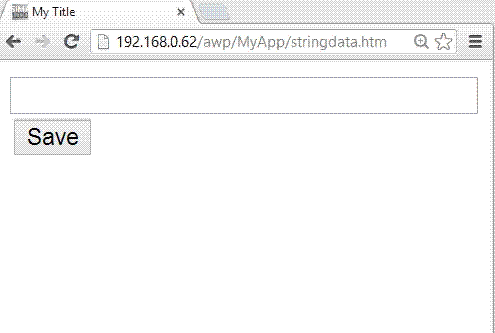
Modifying PLC Tags From the Browser
A user web page would not be very helpful without allowing the user to modify PLC values. The following HTML page illustrates the simplest way of editing PLC tag values. The special comment field (AWP_In_Variable) at the top tells the PLC which tags are allowed to be modified. You will not be able to edit the tag values unless you include this comment for each tag.
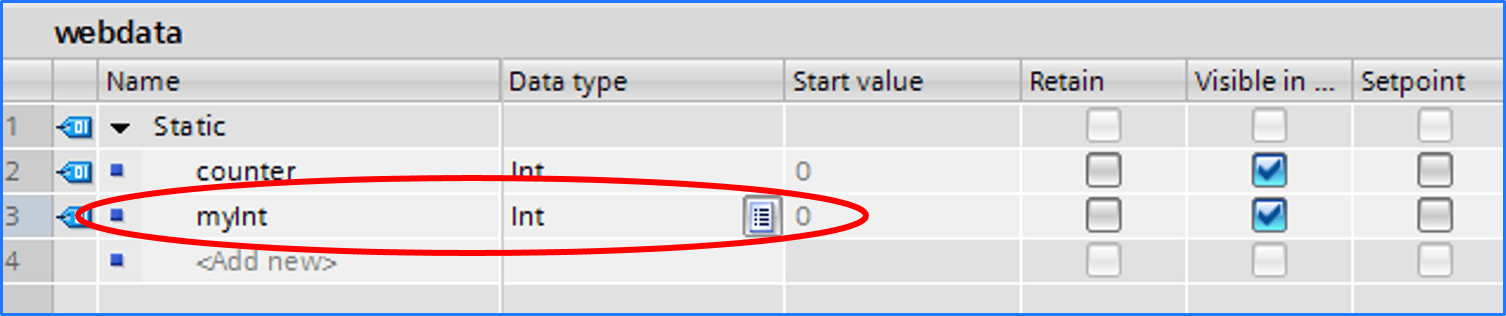
First create a new variable in the "webdata" DB:po
Then modify "index.htm" as follows:
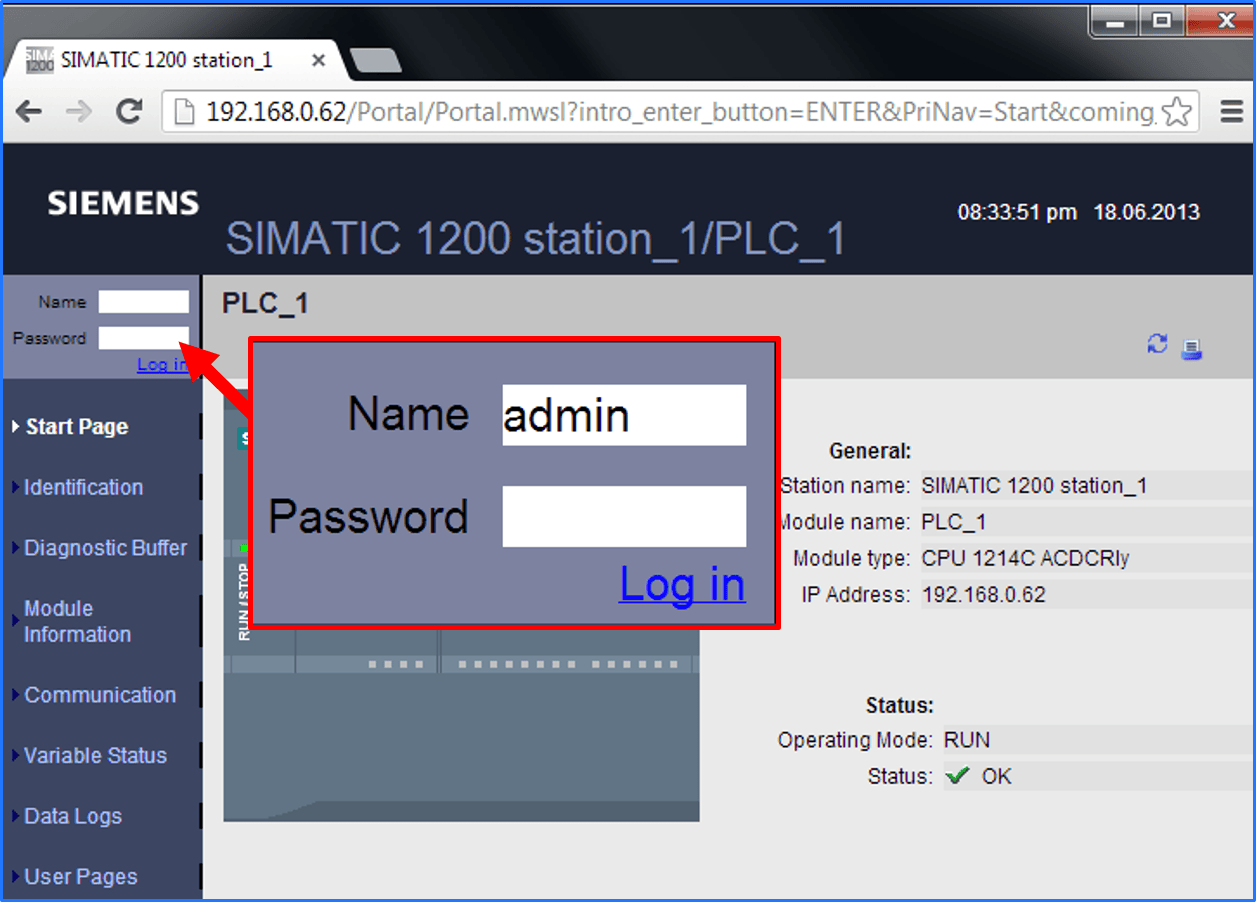
<!-- AWP_In_Variable Name='"webdata".myInt' --><!DOCTYPE html><html lang="en"> <head> <meta charset="utf-8"> <title>My Title</title> </head> <body> :="webdata".myInt: <form method="post"> <input name='"webdata".myInt' type="text" /> <button type="submit">Save</button> </form> </body></html>The PLC will not allow you to modify values unless you are logged-in. Make sure to log in before navigating to the editor page you just created. The default user name is admin and the default password is blank so you can leave that field empty.
After you have logged-in, browse to the page and go online with the PLC. You should be able to edit the tag value using the web page you just created. Notice how the page flickers when the save button is pressed. This is because a post-back is occurring and the page gets refreshed.
In order to update PLC tags without experiencing the post-back, we can use some more JavaScript to update the value in the background. First we need to create another HTML file and move our tag reference to it.
In order to illustrate this, create a new variable in the "webdata" DB called triangleWave. Then write some code to make this value count up to 100 and then back down to -100, or whatever logic you like. Next create a new file called "IOtriangleWave.htm" that looks like this:
"IOtriangleWave.htm"
<!-- AWP_In_Variable Name='"webdata".triangleWave' -->:="webdata".triangleWave:<!-- AWP_In_Variable Name='"webdata".triangleWave' --><!DOCTYPE html><html lang="en"> <head> <meta charset="utf-8"> <title>Javascript Example</title> <script src="jquery-2.0.2.min.js"></script> </head> <body> <!--This label value is being updated in the background using JavaScript--> <label id="triangleWave" name="triangleWave">:="webdata".triangleWave:</label> </br> <input id='setvar' type="text" /> <!--This button modifies the value in the background using JavaScript without a postback--> <button>Modify</button> <p><img src="logo-DMC.png" alt="DMC Logo"><p/> </body> <script type="text/javascript"> $(document).ready(function(){ //query the trianglewave variable every second $.ajaxSetup({ cache: false }); setInterval(function() { $.get("IOtriangleWave.htm", function(result){ $('#triangleWave').text(result); }); },1000); //modify the triangleWave value $("button").click(function(){ url="IOtriangleWave.htm"; name='"webdata".triangleWave'; val=$('input[id=setvar]').val(); sdata=escape(name)+'='+val; $.post(url,sdata,function(result){}); }); }); </script></html>Server Side Logic - String Variables
Full-featured web servers have powerful server-side engines that can dynamically generate HTML pages. The Siemens PLC has a small embedded server, but there are still a few server-side things that can be done.
Up to this point, we have been experimenting with integer tag values. If you embed a string tag into your page and include some HTML formatting in the string value, it will render as HTML. Notice below that the string value is not displaying the exact values typed, but rather rendering as HTML:
Below are the HTML values that were assigned to the string tag above:
<font size="30" color="green">GREEN </font><font size="40" color="red">RED </font><ol> <li>Message 1</li> <li>Message 2</li> <li>Message 3</li></ol><ol> <li><font color="blue">Information</font></li> <li><font color="orange">Warning</font></li> <li><font color="red">Error</font></li></ol>Another technique that is very powerful for performing server-side logic is Delayed Delivery. This is a technique that uses the WWW Function (in conjunction with DB333) to make the web-server wait before returning a requested page to the user. This allows the PLC to ensure that tag values are properly updated before being rendered on the web page. A typical example would be a recipe editor web page. The user selects a recipe from a dropdown box (which will cause a post-back and a page refresh). We must ensure that the new recipe values have been loaded into the PLC tags before refreshing the page. Normally the compiler automatically assigns a fragment number for each user-generated file. In order to control the delivery of pages (i.e. fragments), we must specify a fragment number in the HTML file as shown below:
<!-- AWP_Start_Fragment Name="Control" Type="manual" ID="2" -->Adding this special comment to the top of your HTML file tells the compiler to use fragment #2 for this file. You can specify the fragment number by setting the ID field to the desired number.
Now that we know our file will be fragment #2, we can control the delivery of the page to the browser. Below is a typical rung of ladder logic for implementing the delayed delivery of the page. In my example, the "continue" bit does not become true until the recipe loading is complete. In my case, the loading of a recipe required several PLC scans, so I needed to delay the page delivery until the recipe was loaded. Note that the PLC can support several simultaneous connections. If your application will support several simultaneous browser connections, you will have to replicate the code below for each index of the arrays shown. Currently only index 1 is handled in the code below.
Conclusion
Knowing the basics and a few advanced tricks will enable you to create fully featured web pages served from a Siemens PLC. If you are comfortable with JavaScript, you can do some pretty amazing things and make a web page that looks and feels as good as a traditional HMI. Below is a simple example showing graphing, gauges, user input, and pop-up alerts. This looks and feels like a native app when running on my iPad or Android tablet. Click on the image below to see it in action. Happy coding!

<!DOCTYPE html><head> <meta charset="utf-8"> <title>DMC Gage Demo</title> <script src="js/jquery-2.0.2.min.js"></script> <script src="js/raphael.2.1.0.min.js"></script> <script src="js/justgage.1.0.1.min.js"></script></head><body><div id="g1"></div><div id="g2"></div> <script type="text/javascript"> $(document).ready(function(){ var g1, g2; var g1 = new JustGage({ id: "g1", value: getRandomInt(-100, 100), min: -100, max: 100, title: "Triangle Wave", label: "Value" }); var g2 = new JustGage({ id: "g2", value: getRandomInt(0, 100), min: 0, max: 100, title: "random data", label: "" }); $.ajaxSetup({ cache: false }); setInterval(function() { g2.refresh(getRandomInt(50, 100)); $.get("IOtriangleWave.htm", function(result){ g1.refresh(parseInt(result)); g2.refresh(getRandomInt(50, 100)); }); },1500); });</script></body></html>Sumber : https://www.dmcinfo.com/latest-thinking/blog/id/8567/siemens-s7-1200-web-server-tutorial--from-getting-started-to-html5-user-defined-pages 


