Dynamic Blinkie Text Generator at TextSpace.net

Feedburner

I heart FeedBurner

Selasa, 31 Juli 2018

Cara membuang koma atau titik di angka ribuan

Contoh :
<?php

//menangkap data yang dipostkan di form
$angkaa= $_POST['angkaa'] ;
$angkab= $_POST['angkab'] ;

//membuang titik dengan menggunakan fungsi replace
$angka1= str_replace(".", "", $angkaa);
$angka2= str_replace(".", "", $angkab);
echo "$angka1 <br/> $angka2";

?>

Senin, 30 Juli 2018

Jumat, 27 Juli 2018

Mengurangi stok mysql dengan Trigger

Apa itu TRIGGER?? silahkan googling pasti bnyak sekali penjelasanya, saya coba mengartikan menurut saya pribadi. trigger adalah bahasa Inggris dalam bahasa Indonesia nya adalah “pemicu” nah apa yang dipicu tentu saja adalah sebuah fungsi atau prosedur yang dikerjakan oleh database, jadi di dalam koding pembuatan program tentusaja akan menguntungkan kita karena beberapa code yang biasanya lewat program jadi terpangkas.
Bagaimana menjalankan TRIGGER?? tentu saja akan banyak menemukan artikel juga kalau kita googling, mungkin semua database juga memiliki aturan yang sama soal trigger tidak tahu juga kalau ada yang lain. ada 6 Event untuk mengaktifkan/dimana trigger dipasang yaitu :
  1. AFTER/BEFORE INSERT ( trigger aktif setelah/sebelum record baru diinsert)
  2. AFTER/BEFORE UPDATE ( trigger aktif setelah/sebelum record diupdate)
  3. AFTER/BEFORE DELETE ( trigger aktif setelah/sebelum record dihapus)
Soal penggunaan logika dan algoritma trigger sebenarnya sama saja, cuman saya sendiri tidak terbiasa dengan bahasa trigger jadi ya agak kesulitan memainkan fungsi yang agak kompleks, oke langsung saja saya akan memberikan contoh yang sangat simple yaitu menambah dan mengurangkan stok, anggap saja ini sistem persediaan, kita akan bermain didatabase saja contoh menggunakan XAMPP ver 1.8.1 kalau ada perbedaan harap menyesuaikan ya 😀
pertama-tama kita buat dulu database sederhana kita beri nama : Inventory, atau terserah apalah bagi yang belum bisa buat databasae coba simak altikel berikut.
oke selanjutnya kita buat tabel-tabelnya yaitu barang, jual, dan beli
1
2
3
4
5
6
7
8
9
10
11
12
13
14
15
16
17
18
19
20
21
22
23
CREATE TABLE IF NOT EXISTS `barang` (
 `kodebrg` varchar(15) NOT NULL,
 `nama` varchar(15) NOT NULL,
 `satauan` varchar(5) NOT NULL,
 `stok` int(11) NOT NULL,
 PRIMARY KEY (`kodebrg`)
) ENGINE=InnoDB DEFAULT CHARSET=latin1;
 
CREATE TABLE IF NOT EXISTS `beli` (
 `nofaktur` varchar(15) NOT NULL,
 `tgl` date NOT NULL,
 `kodebrg` varchar(15) NOT NULL,
 `qty` int(11) NOT NULL,
 PRIMARY KEY (`nofaktur`)
) ENGINE=InnoDB DEFAULT CHARSET=latin1;
 
CREATE TABLE IF NOT EXISTS `jual` (
 `nofaktur` varchar(15) NOT NULL,
 `tgl` date NOT NULL,
 `kodebrg` varchar(15) NOT NULL,
 `qty` int(11) NOT NULL,
 PRIMARY KEY (`nofaktur`)
) ENGINE=InnoDB DEFAULT CHARSET=latin1;
perhatikan struktur tabel agar trigger bisa di eksekusi!! pakek analogi sederhana kita akan mengurangi stok dari tabel barang kita lock PK(Primary Key)-nya dalam kasus ini kodebrg ini kita jadikan senjata ditabel lain untuk memicu trigger nantinya, atau bahasa mudahnya tabel yang akan dipasang trigger harus memiliki field tabel yang akan di kenakan trigger.
jika sudah jadi masukan beberapa data barang lewat menu Insert, saya coba seperti tampak pada gambar dibawah ini
mysqltrigger-01
selanjutnya coba kita pasang Trigger di tabel jual, kita gunakan fasilitas yang sudah ada saja perhatikan gambar
mysqltrigger-02
maka akan tampak tampilan jendela trigger seperti gambar dibawah :
mysqltrigger-03
Penjelasanya :
– Trigger name : nama trigger (terserah isikan nama apa saja cuman buat mempermudah saat edit dsb).
– Table : dimana Trigger tersebut aktif
– Time serta Event : sudah dijelaskan diatas yaitu waktu dimana trigger dieksekusi
(jika diterjemahkan maka trigger dengan nama : TG_STOKUPDATE_JUAL akan aktif setelah tabel jual melakukan insert record)
– Definition : adalah isi trigger yang kita buat, penjelasan
1
2
3
4
5
6
7
BEGIN
 UPDATE barang SET stok=stok-NEW.qty
 //mengupdate tabel barang filed stok, dimana stok=stok (dikurangi)
 //NEW.qty maksutnya field qty dari record baru yang di insert ditabel jual
 WHERE kodebrg=NEW.kodebrg;
 //dimana kodebrg nya adalah field kodebrg dari record baru yang diinsert ditabel jual
END
– Definer : yang menggunakan trigger, root@% (maksutnya user root di semua ip) bisa juga root@localhost, atau ip yg diperbolehkan saja root@192.168.1.1 misalnya.
Setelah itu lakukan cara yang sama tambahkan trigger pada tabel beli tidak perlu takut salah karena bisa diedit juga, karena logikanya jika kita beli maka nambah stok maka cukup sedikit dirubah pada tanda matematisnya menjadi  :
UPDATE barang SET stok=stok+NEW.qty
Oke sekarang coba lakukan insert di tabel jual maupun beli lewat mysql saja, perhatikan baik2 stoknya jangan salah menuliskan kode barang karena klo salah trigger tidak jalan, lihat gambar :
mysqltrigger-04
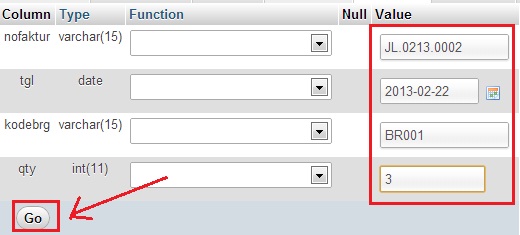
Maksutnya kita akan menjual barang dengan kodebrg BR001 sejumlah 3, nah setelah di eksekusi coba buka tabel barang yang tadinya barang dengan kode BR001 (Rinso) stok: 10, sekarang berkurang menjadi 7. lakukan test juga pada tabel beli maka stok akan otomatis bertambah…

bagi yang ingin mencoba silahkan download file sql ujicoba tersebut disini.

Sumber : https://mboloz.wordpress.com/2013/02/22/trigger-mysql-mengurangi-stok/

Kamis, 19 Juli 2018

HTML5 Mobile Device Camera Access

While working on a custom mobile admin for Wordpress I came across the need to access a mobile device's camera/images. I couldn't use services like Phone Gap because the admin would be packaged with a premium theme, so a native app was out of the question. After doing some research I came across this little nugget.
<input type="file" accept="image/*" capture="camera" />
By adding the accept and capture attributes I was able to access my phone's camera and images. I should also point out that you don't need to do anything special with your php form in order to store the image...it acts just like a standar file upload input in a browser. The only catch is it only works with iOS6+ or Android 3.0+. I'm not worried about backwards compatibility, so this little code snippet saved me hours of work. Hopefully it'll do the same for you.

Sumber : https://coderwall.com/p/epwmoa/html5-mobile-device-camera-access

Rabu, 04 Juli 2018

Flask-seasurf

SeaSurf is a Flask extension for preventing cross-site request forgery (CSRF).
CSRF vulnerabilities have been found in large and popular sites such as YouTube. These attacks are problematic because the mechanism they use is relatively easy to exploit. This extension attempts to aid you in securing your application from such attacks.
This extension is based on the excellent Django middleware.

Installation

Install the extension with one of the following commands:
$ easy_install flask-seasurf
or alternatively if you have pip installed:
$ pip install flask-seasurf

Usage

Using SeaSurf is fairly straightforward. Begin by importing the extension and then passing your application object back to the extension, like this:
import Flask
from flask_seasurf import SeaSurf

app = Flask(__name__)
csrf = SeaSurf(app)
This extension is configurable via a set of configuration variables which can be added to the Flask app’s config file:
  • CSRF_COOKIE_NAME for the cookie name
  • CSRF_COOKIE_TIMEOUT for the cookie timeout
  • CSRF_COOKIE_HTTPONLY for setting the cookie HTTPOnly flag
  • CSRF_COOKIE_SECURE for setting the cookie secure flag
  • CSRF_COOKIE_PATH for setting the cookie path
  • CSRF_COOKIE_DOMAIN for setting the cookie domain
  • CSRF_DISABLE to disable CSRF prevention
Except for the last option, all values are passed verbatim to the Response.set_cookiemethod.
Corresponding code will need to be added to the templates where POST, PUT, and DELETE HTTP methods are anticipated. In the case of POST requests a hidden field should be added, something like this:
<form method="POST">
    ...
    <input type="hidden" name="_csrf_token" value="{{ csrf_token() }}">
</form>
The extension adds a global function to the Jinja template engine called csrf_token. This is a function that retrieves the current token and will be matched against the request token.
By default all requests that are not GET, HEAD, OPTIONS, or TRACE are validated against the CSRF token sent by the client and as rendered on the page. However a view may be completely exempted from validation using the exempt decorator. For instance it’s possible to decorate a view as shown below:
@csrf.exempt
@app.route('/exempt_view', methods=['POST'])
def exempt_view():
    '''This view is exempted from CSRF validation.'''
    return 'foobar'
By default when a request is determined to be secure, i.e. using HTTPS, then we use strict referer checking to prevent a man-in-the-middle attack from being plausible. To disable checking the Referer header, set the Flask app’s configCSRF_CHECK_REFERER to False.
Note
  • Setting TESTING = True in config will disable the token generation!
  • If you are getting None as token check if TESTING = True in config.

AJAX Usage

AJAX is not exempted from CSRF validation as it is a plausible vector for cross-site request forgery. As such, POSTing with AJAX can make use of the aforementioned method, but other HTTP methods, such as PUT and DELETE might be better suited to using the X-CSRFToken header instead.
Essentially this header is passed back to the backend by way of extracting the token from the cookie using JavaScript. For a better explanation of how this might be done please refer to the Django CSRF documentation.

Flask-WTForms Usage

If you would like to use Flask-Seasurf with a form generator, such as WTForms, it is possible to do so. Below is a simple example.
First we will define a custom SeaSurfForm object in a seasurf_form module like so:
from flask_wtf import Form, HiddenField
from flask import g

# import your app here
from your_project import app


class SeaSurfForm(Form):
    @staticmethod
    @app.before_request
    def add_csrf():
        csrf_name = app.config.get('CSRF_COOKIE_NAME', '_csrf_token')
        setattr(SeaSurfForm,
                csrf_name,
                HiddenField(default=getattr(g, csrf_name)))
Now assume we define a module forms as such:
from flask_wtf import DataRequired, TextField, PasswordField, Email
from seasurf_form import SeaSurfForm


class LoginForm(SeaSurfForm):
    email = TextField('email', validators=[DataRequired(), Email()])
    password = PasswordField('password', validators=[DataRequired()])
This is the basis of our login form which we will serve up in a view to the user. Finally we can use this in our template login.html:
<form method="POST" action="{{ url_for('login') }}">
    {{ form.hidden_tag() }}

    <p>
        {{form.email.label }} {{ form.email(size=50) }}
    </p>
    <p>
        {{form.password.label }} {{ form.password(size=50) }}
    </p>
    <p>
        <input type="submit" value="Login">
    </p>
</form>

API

class flask_seasurf.SeaSurf(app=None)
Primary class container for CSRF validation logic. The main function of this extension is to generate and validate CSRF tokens. The design and implementation of this extension is influenced by Django’s CSRF middleware.
Tokens are generated using a salted SHA1 hash. The salt is based off a a random range. The OS’s SystemRandom is used if available, otherwise the core random.randrange is used.
You might intialize SeaSurf something like this:
csrf = SeaSurf()
Then pass the application object to be configured:
csrf.init_app(app)
Validation will now be active for all requests whose methods are not GET, HEAD, OPTIONS, or TRACE.
When using other request methods, such as POST for instance, you will need to provide the CSRF token as a parameter. This can be achieved by making use of the Jinja global. In your template:
<form method="POST">
...
<input type="hidden" name="_csrf_token" value="{{ csrf_token() }}">
</form>
This will assign a token to both the session cookie and the rendered HTML which will then be validated on the backend. POST requests missing this field will fail unless the header X-CSRFToken is specified.
Excluding Views From Validation
For views that use methods which may be validated but for which you wish to not run validation on you may make use of the exempt decorator to indicate that they should not be checked.
A decorator to programmatically disable setting the CSRF token cookie on the response. The function will be passed a Flask Response object for the current request.
The decorated function must return True or False.
Example usage of disable_cookie might look something like:
csrf = SeaSurf(app)

@csrf.disable_cookie
def disable_cookie(response):
    if is_api_request():
        return False
    return True
exempt(view)
A decorator that can be used to exclude a view from CSRF validation.
Example usage of exempt might look something like this:
csrf = SeaSurf(app)

@csrf.exempt
@app.route('/some_view')
def some_view():
    return render_template('some_view.html')
Parameters:view – The view to be wrapped by the decorator.
include(view)
A decorator that can be used to include a view from CSRF validation.
Example usage of include might look something like this:
csrf = SeaSurf(app)

@csrf.include
@app.route('/some_view')
def some_view():
    return render_template('some_view.html')
Parameters:view – The view to be wrapped by the decorator.
init_app(app)
Initializes a Flask object app, binds CSRF validation to app.before_request, and assigns csrf_token as a Jinja global.
Parameters:app – The Flask application object.
validate()
Validates a CSRF token for the current request.
If CSRF token is invalid, stops execution and sends a Forbidden error response to the client. Can be used in combination with exempt to programmatically enable CSRF protection per request.
Example usage of validate might look something like:
csrf = SeaSurf(app)

@csrf.exempt
@app.route('/sometimes_requires_csrf')
def sometimes_requires_csrf():
    if not oauth_request():
        # validate csrf unless this is an OAuth request
        csrf.validate()
    return render_template('sometimes_requires_csrf.html')
Sumber : http://flask-seasurf.readthedocs.io/en/latest/ 

Sea Surfer CSRF

Lately I have taken an interest in web application security, as covered by OWASP. One common vulnerability in web applications is to be sensitive to CSRF attacks. I have made a small tool in the form of a bookmarklet to detect CSRF vulnerabilities and create proof-of-concept exploits. It is very simple, but it does the job. There will probably be cases when it doesn’t work, but mostly it should. I guess there are similar tools out there already, and you can do this with Firebug for example (albeit that is a bit more cumbersome), but make not mistake: I’m in it for the code.

INSTALLATION

  • Add the jQuerify bookmarklet to your bookmarks (go to Learning jQuery to find it)
  • Add the Sea Surfer bookmarklet to your bookmarks (by dragging it to your bookmarks bar, for example)
Why do you need to install jQuerify? I was a little lazy and used jQuery in the code, and when I tried to use a jQuery Bookmarklet generator (that would include jQuery for me), Firefox blocked the popup. I am not exactly sure why, but it may have to do with that the window.open call doesn’t seem to originate from the click on the bookmarklet.

HOW TO USE

  • Choose a page with forms that you want to check
  • Run jQuerify by clicking it
  • Run the Sea Surfer by clicking it
  • In the resulting window or tab, all forms on the page will be displayed in text areas. Choose one that does not contain any CSRF tokens or similar, edit the inputs and then click “Test vulnerability”
An iframe will open and the form will be added to it. It will be submitted automatically. If the submit succeeded, you can use the edited form as a proof of concept when you report the vulnerability. I have only tested this in Firefox and Chrome (in Windows).

SOURCE CODE

I have more or less hacked this together. Do not expect the highest code standards. Please modify it anyway you want to, though. Then make a bookmarklet of it, with a bookmarklet generator if you want to. I used the Bookmarklet Crunchinator. In the bookmarklet I’ve base64 encoded the code to be able to include the bookmarklet in this page (it broke the page layout, and I may have spent more on trying to fix that than on the code itself). This is not necessary if you convert the code to a bookmarklet yourself and just put it in your bookmarks.
1
2
3
4
5
6
7
8
9
10
11
12
13
14
15
16
17
18
19
20
21
22
if (typeof jQuery === 'undefined') {
    alert('Run jQuerify first!');
} else {
    var w = window.open();
    var body = jQuery(w.document.body);
    jQuery('form').each(function(i) {
        var clone = jQuery(this).clone();
        var inputs = clone.find('input,textarea,select');
        var area = jQuery('<textarea id=\'area' + i + '\' cols=120 rows=50>');
        var desc = '<h1>Form ' + i + '</h1><p>Edit the values and click \'Test vulnerability\' to try it out.</p>';
        var script = 'javascript:function insertAfter(newChild,refChild){refChild.parentNode.insertBefore(newChild,refChild.nextSibling);} var area = document.getElementById(\'area' + i + '\'); var iframe = document.getElementsByTagName(\'iframe\')[0]; if (!iframe) { iframe = document.createElement(\'iframe\'); insertAfter(iframe, area); }  iframe.contentDocument.write(area.value);';
        var a = document.createElement('a');
        a.href = clone.attr('action');
        clone.attr('action', a.href);
        clone.empty();
        clone.append(inputs);
        area.text(clone.wrap('<div>').parent().html().replace(/>/g, '>\n') + '<script>document.getElementsByTagName(\'form\')[0].submit();</script>');
        body.append(desc);
        body.append(area);
        body.append('<br/><input type=submit value="Test vulnerability" onclick="' + script + '"/><br/>');
    });
}
Finally: the point of this is to find vulnerabilities in your own web apps and fix them, or in other web apps and report them.
Sumber : https://javahacker.com/the-sea-surfer-a-simple-tool-for-csrf-vulnerability-detection-and-proof-of-concept-creation/